Pin It button on image hover
Showing posts with label Invitations to Dessert. Show all posts

Saturday, June 15, 2013

A Book Baby Shower

My little sister is having her first baby - literally any day now - and we had an absolutely adorable shower for her a couple of months ago.   Yes, it was in April, and I'm just now posting about it - it happens.

I started out on Pinterest to find some ideas and quickly had about four different themes planned when I realized that they all revolved around children's books.  Reading with my kids is one of my favorite moments of the day and they both love books.  I hope that Nikki will enjoy reading with baby Colton just as much and we wanted to get her library started for him.

I love how this shower turned out and was so happy to get to throw it -- now I just can't wait to meet baby Colton!!


I took a few shortcuts with the food on this shower since I was travelling by plane to get there.  We ordered the cake from a bakery and everything on the menu was quick and easy to prepare.


For the invitations, I just put together some images of the characters in several of the books we were using.  I made coordinating signs for each of the dishes on the menu as well to tie the food into the book theme.

The menu and book pairings included:

Sam I Am's Green Deviled Eggs - complete with the egg whites dyed green instead of the egg yolks - based on a Pinterest tutorial I found here, you can dye eggs any color you want and it doesn't affect the flavor at all.


Guess How Much I Love You Veggies and Hummus - it was a stretch but it's "bunny food" and I love this book.


The Very Hungry Caterpillar's Fruit and Yogurt Dip


Where The Wild Things Are & Max's Turkey "Muenster" Sandwiches - a simple sandwich with shaved turkey breast, muenster cheese, baby spinach and mustard.


Cloudy with a Chance of Meatballs - with a quick chili sauce and grape jelly sauced meatball.


If You Give a Mouse a Snickerdoodle - we subbed in Snickerdoodles since they are my sister's favorite.


Jamberry Pies - if you've never heard of the book Jamberry you should look it up, such a cute rhyming story.  I made mini cherry, lemon and apple pies in a muffin tin taking some help from refrigerated pie crust for this one.


And from Giraffe's Cant Dance, Gerald's (non-alcoholic of course) Jungle Juice.


We also used Good Night Moon as a guest book, asking guests to leave a message for Mom or baby.


I made a simple diaper cake and added signs from the book Little Blue Truck and found some animal baby toys to add in for extra fun.


One of the best things about the baby shower was the onesie decorating station we set up outside in lieu of playing traditional shower games.  We had so much fun decorating onesies with fabric paint and stencils and iron-on transfers and they turned out so cute!

Friday, April 20, 2012

My baby girl turned One!

Yes it was two months ago... and I'm just now getting around to sharing a few of the details.  I know, life has been a little crazy around here as we prepare for baby number 2... can't believe she'll be here in another 6 weeks or so, and try to finish up all the remodeling projects - the new nursery and master bathroom being at the top of the list.  But even in those two months, I still can't believe my baby girl is over a year old, walking, jabbering constantly and really developing quite the personality.


For Aubrey's party - we did a little bit of a circus/carnival theme - I'll admit largely due to the fact that I was slightly obsessed with the pennant flag banners that are popping up all over the place right now.  I just love them and thought they would make adorable party decor.  My sister Nikki, of Doodle Dog Advertising, made some adorable invitations for the party featuring a cute little elephant that I decided to use for the cookies too.

Photo by DoodleDog Advertising

I combined the elephants with some friendly little lions inspired by cookies that I had bookmarked quite a while ago from Bridget at Bake at 350.  I love the way they turned out, but a word of warning, don't ever try to layer your cookies with wax paper when you run out of parchment paper at 10 pm, the wax paper stuck to the frosting in several places and I had to do some minor cookie reconstructive surgery the day of the party.  My go to sugar cookie recipe can be found here.


For the cakes, I knew I wanted to make Aubrey a simple smash cake and I tied the main cake back to our circus theme with a mini-pennant banner strung from plastic carnival stripe straws.


I used a basic white cake recipe (also seen here) from Magnolia Bakery for both to keep things simple and filled and frosted them with a simple buttercream.  Sprinkles and a fun corkscrew candle were all the decoration the smash cake needed and a simple dot pattern adorned the main cake.


Finally I made a 3rd cake (2nd smash cake) for a photo shoot with Dede Holman Photography the following week so we could have some adorable pictures to document the occasion.

Photo by Dede Holman Photography

For other food at the party I stuck with some simple spins on carnival food - spicy whiskey BBQ sliders (slightly modified from Pioneer Woman - I used ground turkey instead of beef and cut out the majority of the butter and served them on Hawaiian roles), kettle corn, fruit skewers on a stick and animal crackers with a vanilla honey yogurt dip (a simple combination of vanilla yogurt, a little honey for sweetness and some lime zest), nachos with cheese dip and guacamole, mini corndogs muffins (recipe found on Iowa Girl Eats) and veggies and dip.

Traditional White Birthday Cake
Recipe slightly adapted from Magnolia Bakery Cookbook

Cake:
1/2 cup unsalted butter, at room temperature
1 1/2 cups sugar
2 cups self-rising flour
1 cup whole milk
2 tsp vanilla extract
4 egg whites

Preheat oven to 350 degrees. Spray 3 8" baking pans baking spray and line the bottoms with parchment rounds.

Cream the butter on medium high speed until smooth. Add the sugar gradually, beating until light and fluffy, about 3 minutes. Combine milk and vanilla in a measuring cup. Add flour in 3 parts, alternating with the milk, beating well after each addition, beginning and ending with flour. Set batter aside.

Add egg whites to a clean mixing bowl and begin beating on low speed, gradually increasing speed to high as egg whites thicken. Beat until the egg whites make soft peaks. Gently fold into cake batter, 1/3 at a time.

Bake 22-25 minutes until a toothpick inserted in the center of the cake comes out clean. Cool in pans for about 5 minutes, loosen the edges with a knife if necessary, and turn out onto a wire rack to cool completely.


Note: this recipe will make 2 2-layer 6" smash cakes or 1 3 layer 8" cake, so double the recipe if you want to make the 2-tier cake and a smash cake.  In the pictures above, the smash cakes are each built with 2 6" cakes cut in half horizontally to make 4 total thin layers and then torted with buttercream.  The 2-tier cake is done the same way with a 6" cake over an 8" cake.  I did use small wooden dowels for stability when stacking the tiers.


Buttercream Icing

1 cup unsalted butter, at room temperature
1 tsp vanilla extract
1/4 cup heavy cream
1 lb powdered sugar

Beat butter in a large mixing bowl for 2-3 minutes until smooth and creamy, add in vanilla and cream and mix on low speed until incorporated.  Add powdered sugar in a several additions to prevent it from making a giant cloud of sugar all over your kitchen.  Mix on low speed until incorporated and increase speed gradually to medium high and whip an additional 1-2 minutes.  Icing should be thick but easily spreadable. 

Note: this will make enough icing to torte and ice at least one smash cake but you will need more to do all of the cakes above.

Wednesday, July 21, 2010

Invitations to Dessert: Cupcake Bar

For a recent event, Nikki from Doodle Dog and I teamed up to create a cupcake bar. For this summer party, we wanted some fun flavors and bright colors. Nikki designed some signs to put on the cupcake bar to identify the flavors and add a playful feel reminiscent of a 1950’s soda shop to the buffet.


What really elevates this cupcake bar to the next level are the special little touches of detail. Sure we could have just set out the cupcakes on plates and called it a day – but putting in the extra effort to add cute little coordinating signs and adding garnishes to the cupcakes makes it all special.

The signs were made on heavy smooth white paper. Carrying the same design theme from sign to sign really helped tie the entire cupcake bar and all of the flavors together perfectly. Nikki crafted the silver stands for next to nothing with some cheap finds and a can of paint from Michael’s. Each stand held one of the circle signs that coordinated with the matching cupcake flavor. All of the cupcakes were displayed nicely on some chargers that we also painted silver to match the rest of the bar.

The Flavors:

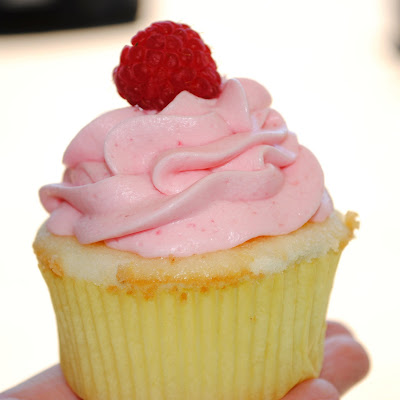
Pink Lemonade – a lemon cupcake with a delicious raspberry buttercream topped with a fresh raspberry. (See the recipe below)


Oreo Cookie Cupcake – a cookies and cream cupcake with half an Oreo on the bottom and more chunks of Oreo mixed in to the batter. Topped with classic cream cheese icing and garnished with another Oreo cookie.


PiƱa Colada – a coconut cupcake topped with a pineapple cream cheese icing and coconut flakes. These were garnished with a pineapple and maraschino cherry pick.


Check back soon for the remaining cupcake recipes and head on over to Nikki’s blog to see what she’s working on next.


Pink Lemonade Cupcakes
Cake from Triple Lemon Cupcakes, Frosting adapted from SouthernLiving, March 2009

Cake:
1 1/2 cups all purpose flour
1 tsp baking powder
1/2 tsp salt
1/4 cup unsalted butter, at room temperature
2 ounces cream cheese, at room temperature
1 cup sugar
3 large eggs
1/4 cup plus 2 T lemon juice
1/2 cup buttermilk
Zest of 1 lemon

Preheat the oven to 350 degrees and line 12 cup muffin tin with liners. Sift together flour, baking powder and salt in a small bowl and set aside.

Add sugar and lemon zest to mixing bowl or stand mixer and rub zest into sugar with your fingertips until well distributed and fragrant. Add the butter and cream cheese to the sugar and beat until light and creamy, 2 - 3 minutes. Add the eggs, one at a time, beating about 1 minute after each egg. Add 1/3 of the flour mixture, beating on low speed until just incorporated. Add 1/2 of the buttermilk, once incorporated, add the next 1/3 of the flour mix, followed by remaining buttermilk, and remaining flour, beating each addition until just incorporated. Add lemon juice, beating until just incorporated on low speed.

Transfer batter to muffin cups, filling each about 2/3 of the way full. Bake for approximately 20 minutes or until a toothpick inserted in the center cupcake comes out clean. Cool about 5 minutes in the pan and then remove to a wire rack to cool completely.

Frosting:
½ cup unsalted butter, at room temperature
½ cup fresh raspberries
½ tsp lemon extract
1 pound powdered sugar

Cream butter in a mixing bowl until smooth. Add in raspberries and lemon extract and beat until most of the chunks are gone. Add powdered sugar, one cup at a time, beating on low speed until incorporated. Increase speed to medium and whip for about thirty seconds. Transfer to a piping bag and decorate as desired. Top with fresh raspberries if desired.

Tuesday, June 15, 2010

From Invitations to Dessert: Dessert Bar


Okay time for a long awaited Invitations to Dessert post. I know we said it would be a monthly feature, but Nikki from Doodle Dog got married Memorial Day weekend so we were all a little busy. We will be making this monthly though, so just bear with us please. This post actually features one of the many personal touches from Nikki’s wedding. (She’ll be posting more details soon so stay tuned!)

(Pictures by me and Jimmages Photography)


Nikki decided to do a cookbook featuring classic family dessert recipes in conjunction with a dessert bar at her wedding as a favor. She got small white boxes from Uline, added a polka dot tissue paper and tied a coordinating ribbon around them. The “thank you” tag ties in to the tag from her invitation suite. The paper products really tied the look of the whole wedding together. The cookbook was a 3x4 twelve page booklet that Nikki designed titled Love is Sweet. Inside the front cover, she wrote a thank you to the guests and prompted guests to fill the box at the dessert bar. The empty boxes were placed at each place setting.


(Picture by Amy Barry Photography)


The dessert bar featured Nikki and her husband’s favorite family recipes close family members. Nikki designed coordinating labels to go along with clever titles for each dessert. Using several different cookie jars and platters added aesthetical interest to the dessert bar and the cute signs tied everything together. She used cookie jars from Target, an Anchor Hocking 3-tier cupcake stand, and silver chargers.

Click here to go to Nikki's site for more details from the dessert bar and her wedding.

(Pictures by Amy Barry Photography)


The dessert bar included:
Mother of the Groom’s Famous Banana Bread
Mother of the Bride’s Sweet Snickerdoodles
Grammie’s Rich 7-layer Bars
Grandma Mo’s Salty Ranch Pretzels
Grandma Kress’s Decadent German Chocolate Cupcake Bites
Mother of the Groom’s Chunky Chocolate Pecan Cookies
Grandma Tootie’s Awesome Oatmeal Raisin Cookies
Aunt Sue’s Crunchy Peanut Bars

While not all of these wonderful people are still here, we all still remember the recipes. These were desserts that showed up at major family events or they were always there when you showed up at grandma’s house. My mom and I made several of the recipes including the snickerdoodles, the oatmeal raisin cookies and the German Chocolate Cupcake Bites.


(Pictures by Amy Barry Photography)


I’ve posted all of these recipes before but I wanted to tell you about the slight changes I made to the German Chocolate Cupcake Bites this time around. I used the same recipe but when I made the frosting, I left out the chopped pecans. Instead I frosted the cupcakes and then used pecan halves to top each one. This made for a much more polished look for the cupcakes, really making the presentation much better since the custard frosting can’t be piped like a traditional buttercream. I also baked the cupcakes in plain white liners and then dropped them into decorative blue gingham liners to match the wedding colors. If I would have baked the cupcakes in the blue liners, the chocolate cake would show through too much and you wouldn’t notice the pattern.


(Pictures by Jimmages Photography and me)


Since I've posted all the recipes we made before, I'm going to give you the recipe for the mother of the groom's famous banana bread, which we served in mini-muffin form on the dessert bar.

Banana Bread
Family recipe

1 1/2 cups sugar
1/2 cup oil
2 eggs
3 ripe bananas, mashed
4 T milk
1 tsp vanilla
2 cups flour
1 tsp baking soda

Preheat oven to 350 degrees and prepare pans. Cream together the sugar and oil in a large mixing bowl, add eggs, milk, vanilla and mashed bananas. Mix well. Sift together dry ingredients and add to wet mix. Mix just until well combined.

To make bars, pour into a greased 9x13 pan and bake for approximately 40 minutes. To make mini muffins, grease muffin tins and bake for approximately 15-20 minutes until golden brown and the tops spring back when touched. Cool completely and serve.

Sunday, April 25, 2010

From Invitations to Dessert: Chocolate Chip Cookie Dough Cupcakes

Today, I want to introduce a new feature: From Invitations to Dessert. I’m pairing up with Nikki from Doodle Dog, a design shop out of the Dallas area, to bring you monthly blog posts featuring a dessert matched with an invitation. We’ll show you ways to carry your party theme from invitations to dessert, picking up design cues throughout, whether it’s a wedding, company party, a birthday extravaganza or a shower of some sort.


First, let me tell you a little about Nikki and her company. Nikki created Doodle Dog in 2008, and focused primarily on commercial advertising (logo design, web design, etc.) but after many requests to create invitations for parties and weddings, she decided to add that service to the mix. From there, the rest was history; now invitations, announcements and other fun party favors have become a part of her repertoire, and as she says, “I have the dream job, I work with expecting moms, excited brides and party planners on a daily basis and I get to make them smile.” Check out her blog here for more pictures.


We started with the chocolate chip cookie dough cupcake. From there, Nikki created an adorable invitation, matching the cupcake colors and tying in the vintage charm that the dessert evokes. Cupcakes work perfectly for a casual wedding; either in place of the cake or packaged as a favor. Replacing cake with cupcakes is a great way to add a unique element to your wedding and save a little money. These particular cupcakes bring a classic flavor that everyone loves. Arrange them on a large cupcake tower or several vintage cake pedestals. Add a small round cake for the bride and groom to cut if you don’t want to forgo the tradition.


The invitation would be perfect for a casual, vintage outdoor wedding and reception. For the invitation, Nikki used a heavy ivory linen stock with a textured chocolate brown backer. The details really make this piece unique and give it a vintage-casual feel. From the playful font, to the unique printed belly band and Love emblem attached to each piece, the invitation is memorable and personal. The whole suite ties together perfectly and helps set the tone for what will be a night to remember with the soft ruffled ivory ribbon and the patterned envelope liner.


neckties: http://www.billyreid.com/men/mens-neckties.html bride and groom: http://www.stylemepretty.com/2009/10/08/vintage-wedding-with-handmade-details-ii/ flowers in a bucket: http://www.stylemepretty.com/2009/10/08/vintage-wedding-with-handmade-details-ii/ car: http://www.stylemepretty.com/2009/10/08/vintage-wedding-with-handmade-details-ii/ barn: http://www.brides.com/planning/receptions/gallery/3158

Nikki put together this inspiration board to show you how to pull the look together. Little details are important to carry out the look and feel of a wedding reception. Brown and cream striped silk ties for the groomsmen with khaki suits bring in a more casual feeling than a traditional tux, the classic striped tie works perfectly with the vintage theme. The barn becomes casually elegant when draped ivory curtains and strung with white twinkle lights. Tie wheat sheaths with ivory ribbon or raffia and paint pumpkins ivory for centerpieces for a fall wedding; add cherry blossoms in ivory pails and pale pink or ivory peonies for a spring wedding. Add in the perfect classic car to make a grand exit instead of a limo and your theme is complete from invitation to exit.

Click here to see more pictures on Nikki's site.


Chocolate Chip Cookie Dough Cupcakes
Recipe adapted from Annie’s Eats

Cupcake:
1 ½ cups unsalted butter, softened
1 ½ cups light brown sugar, firmly packed
4 eggs
2 2/3 cups all purpose flour
1 tsp baking powder
1 tsp baking soda
Pinch of salt
1 cup whole milk
2 tsp vanilla extract
1 cup chocolate chips (I used milk chocolate)

Preheat the oven to 350 degrees. Line 2 muffin pans with liners. Combine the butter and sugar in mixing bowl, beat on medium-high speed until light and fluffy, about 3 minutes. Add the eggs one at a time, beating after each addition. Scrape the sides of the bowl with a rubber spatula as needed.

In a separate bowl, combine the flour, baking powder, baking soda, and salt. Stir together vanilla and milk in a measuring cup. Add 1/3 of the flour mixture to the batter, mix at low speed. Alternate adding flour mixture in 3 parts with ½ of the milk; beginning and ending with the flour mixture. Mix each addition until just incorporated. Fold in the chocolate chips. Scoop the batter evenly into prepared cupcake liners, filling each about 2/3 to ¾ of the way full. Bake about 18 minutes, until a toothpick inserted in the center comes out clean. Cool in the pan about 5 minutes and then transfer to a wire rack to cool completely before frosting.

Frosting:
1 ½ cups unsalted butter, softened
¾ cup light brown sugar, firmly packed
3 ½ cups powdered sugar
1 cup all purpose flour
½ tsp salt
3 T whole milk
2 ½ tsp vanilla extract
Extra chocolate chips for decoration if desired

Beat the butter and brown sugar until light and fluffy, about 3 minutes. Mix in the powdered sugar, mixing on low speed, until smooth. Add in the flour and salt and beat on low speed until incorporated. Add the milk and vanilla and beat until smooth.

Transfer the frosting to a piping bag fitted with a large star tip and pipe frosting on to cooled cupcakes as desired. Sprinkle chocolate chips on top if desired.

Related Posts with Thumbnails