Pin It button on image hover

Wednesday, March 31, 2010

Margarita Cupcakes


Here's a fun recipe for margarita cupcakes that can be made super quickly thanks to the help of a box of cake mix. The addition of margarita mix, lime zest and a fantastic cream cheese frosting makes them special. These are perfect for a Cinco de Mayo party, a great dessert for a Mexican themed dinner party, or fun for an adult party like a couple's shower or summer barbeque.


Margarita Cupcakes
Recipe adapted from Confections of a Foodie Bride

Cupcakes:
1 box white cake mix (I used Duncan Hines)
7 1/2 ounces margarita mix
2 ounces tequila
1/2 ounce orange juice
3 large egg whites
2 T vegetable oil
Zest of 1 lime

Preheat oven to 350 degrees and line 24 muffin tins with paper liners or spray with baking spray. Mix together margarita mix, tequila and orange juice in a large measuring cup. Add cake mix to mixing bowl and add egge whites, oil, lime zest and tequila mix. Beat on low speed for about 30 seconds until dry ingredients are incorporated and then beat on medium high speed for 2 minutes. Spoon batter evenly into muffin cups, filling about 2/3 of the way full. Bake for 20-25 minutes until a toothpick inserted in the center cupcake comes out clean. Cool about 5 minutes in the pan and then cool completely on wire racks.


Icing:
8 oz cream cheese, room temperature
1/2 cup unsalted butter, room temperature
2-3 T lime juice
4 cups powdered sugar
1 tsp lime zest
3-4 drops green food coloring

Beat cream cheese and butter on medium high speed until smooth and fluffy, about 3 minutes. Add 2 T lime juice and lime zest and beat until combined. Add powdered sugar 1 cup at a time, beating on low speed until incorporated. Add more lime juice if necessary. Add food coloring a couple drops at a time and beat on medium high speed until desired color is reached and icing is smooth. Pipe onto cooled cupcakes as desired.


Lime wedges, straws, and sprinkles all make festive garnishes. Refrigerate cupcakes in an airtight container if not serving immediately and bring to room temperature a couple hours prior to serving.


Sunday, March 28, 2010

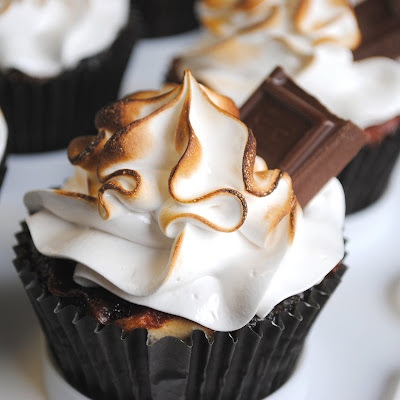
S'mores Cupcakes


Graham cracker "crust", Hershey's chocolate, chocolate marshmallow cake, toasted marshmallow frosting... these cupcakes are the cake version of everyone's favorite campfire treat. They are fun to make and although it sounds like a lot of steps, each step is fairly simple. The "toasted" marshmallow can be achieved with a kitchen torch which is always fun to use and makes for an impressive presentation.


S'mores Cupcakes
Recipe adapted from Annie's Eats

Crust:
1 1/2 cups graham crackers (approx. 1 pkg out of the Honeymaid box)
1/4 cup sugar
5 T unsalted butter, melted
2 oz bittersweet chocolate, chopped into small pieces
Marshmallows (you'll need about 100 mini marshmallows)

Preheat the oven to 350 degrees. Line 24 muffin cups with paper liners. In food processor, pulse graham crackers until they are fine crumbs. Add sugar and melted butter and mix until well combined. Add approximately 1 tablespoon of crumbs to the bottom of each liner. Use a small circle object (I used a shot glass) to press the crumb mixture evenly into the bottom of each liner. Bake for 5 minutes and remove from the oven. Divide the chopped chocolate evenly among the cupcakes. Add approximately 4 marshmallows to each tin.


Cake:
2 cups plus 2 T sugar
1 3/4 cups all purpose flour
3/4 cup cocoa powder
1 1/2 tsp baking powder
1 1/2 tsp baking soda
1 tsp salt
2 large eggs
1 cup whole milk
1/2 cup canola oil
2 tsp vanilla extract
1 cup boiling water

Sift together flour, cocoa powder, sugar, baking powder, soda and salt in your mixing bowl. In a small bowl, add eggs, milk, oil and vanilla and whisk together. Add to dry ingredients and beat on low speed until just incorporated. Increase speed to medium and beat 2 minutes. Add boiling water and beat on low until just combined.

Spoon batter evenly into cupcake liners, filling each about 3/4 of the way full. The marshmallows will float to the top but that's okay. Bake approximately 18 - 20 minutes until a toothpick inserted in the center cupcake comes out clean. Cool for about 5 minutes in the pan and then remove to a wire rack to cool completely.


Frosting:
8 egg whites, room temperature
2 cups sugar
1/2 tsp cream of tartar
2 tsp vanilla extract
1 large Hershey bar

In a clean stainless steel mixing bowl or double boiler, combine egg whites, sugar, and cream of tartar. Whisk frequently, heating the mixture over medium-high heat until the temperature reaches 160 degrees. Transfer egg mixture to stand mixer fitted with the whisk attachment. Begin mixing at low speed, gradually increasing to medium-high speed as the mixture becomes thicker. Beat until stiff, glossy peaks form. Add in the vanilla and mix until just combined. Transfer frosting to a piping bag fitted with a large star tip and frost as desired.


Using a kitchen torch held about 6 inches away from the cupcakes on a non-flammable surface, brown the cupcakes lightly as desired. Keep the torch moving so you don't catch any spot on fire. Just like toasting marshmallows by a campfire, slow and steady is a better approach than sticking the marshmallow to close to the fire, you're going for lightly toasted frosting not black and bubbly marshmallow. Garnish with chocolate bar segments.

Wednesday, March 24, 2010

Triple Lemon Cupcakes

Lemon cake... lemon curd filling... lemon cream cheese icing... delicious.


These cupcakes were so good, I made them twice in a two week period. That rarely happens with the stockpile of recipes to try that I have waiting.

I love the cake for these cupcakes, it is so moist and has a very nice lemon flavor. I wasn't sure about the lemon cream cheese frosting at first but it was perfect, especially with the lemon curd filling. Some lemon candy slices made a cute garnish.


Triple Lemon Cupcakes
Cake and Icing Recipe adapted from Brown Eyed Baker and Tartlette
Lemon Curd Recipe from Martha Stewart

Cake:
1 1/2 cups all purpose flour
1 tsp baking powder
1/2 tsp salt
1/4 cup unsalted butter, softened
2 ounces cream cheese, softened
1 cup sugar
3 large eggs
1/4 cup plus 2 T lemon juice
1/2 cup buttermilk
Zest of 1 lemon

Preheat the oven to 350 degrees and line 12 cup muffin tin with liners. Sift together flour, baking powder and salt in a small bowl and set aside.

Add sugar and lemon zest to mixing bowl or stand mixer and rub zest into sugar with your fingertips until well distributed and fragrant. Add the butter and cream cheese to the sugar and beat until light and creamy, 2 - 3 minutes. Add the eggs, one at a time, beating about 1 minute after each egg. Add 1/3 of the flour mixture, beating on low speed until just incorporated. Add 1/2 of the buttermilk, once incorporated, add the next 1/3 of the flour mix, followed by remaining buttermilk, and remaining flour, beating each addition until just incorporated. Add lemon juice, beating until just incorporated on low speed.

Transfer batter to muffin cups, filling each about 2/3 of the way full. I use a cookie scoop to evenly fill the muffin tins. (It also makes it easier to get the batter into the muffin tins without spills and drips all over the pan.) Bake for approximately 20 minutes or until a toothpick inserted in the center cupcake comes out clean. Cool about 5 minutes in the pan and then remove to a wire rack to cool completely.

Lemon Curd:
4 egg yolks
Zest of 1 lemon
1/4 cup plus 1 T lemon juice
1/2 cup sugar
5 T unsalted butter, cold, cut into small pieces

Combine everything but the butter in a sauce pan and whisk together. Cook over medium high heat, stirring constantly with a wooden spoon, scraping the sides of the pan often until thick enough to coat the back of the spoon, about 8 - 10 minutes. Remove pan from heat and add butter, 1 piece at a time, stirring until incorporated. Strain through a fine mesh strainer into a bowl. Press a piece of plastic wrap against the surface of the lemon curd and cover with a lid. Refrigerate at least 1 hour before using.

Frosting:
1/4 cup unsalted butter, softened
4 ounces cream cheese, softened
1 T lemon juice
2 cups powdered sugar
1 tsp lemon zest

Beat together butter, cream cheese and lemon juice on medium-high speed until smooth and creamy, about 3 minutes. Add powdered sugar, 1 cup at a time, beating on low speed until incorporated. Add lemon zest and increase speed to medium-high and beat until smooth.

To assemble:
Use a paring knife to cut a small cone out of the center of each cupcake. Fill a piping bag fitted with a large round tip with lemon curd and pipe into the center of each cupcake. Fill a second piping bag fitted with a large star tip with frosting and pipe a swirl onto the top of each cupcake. Garnish with lemon candy slices (I cut each fruit slice in half so they wouldn't overpower the cupcake) as desired.

Monday, March 22, 2010

Black Bean Salsa


I have to admit that I've published this recipe before... but I did it way back when I didn't really know where I was going with this blog or what would be the best way to organize these recipes. The old recipe is buried in a post with several recipes and there isn't a picture included. Since I make this recipe so often and it's requested all the time, I decided to update the entry.


This recipe takes no time at all to put together and it tastes even better if you make it in advance.

Black Bean Salsa

1 can black beans
2 cans Ro-tel tomatoes
1 each red and green bell peppers, diced
1 red onion, diced
1 can white shoepeg corn
1 cup Italian dressing (I use fat-free)

Rinse and drain the beans and corn and add to a bowl. Add tomatoes, with juice to the mixture. Add diced bell peppers and corn and stir together. Pour 1/2 the dressing over the mixture and stir to combine. Add remaining dressing as desired. Perfect with tortilla chips. This is also great as a relish for quesadillas or tacos.

Cookies and Cream Chocolate Cake


It was my husband's birthday last Thursday so it was a given that I would be baking him a cake, the question was what kind. The one sweet that Todd will pretty much never turn down is an Oreo cookie. In fact sometimes I get irritated by the fact that he knows I will bake him whatever he wants and yet he asks for Oreos. So when I saw a couple versions of an Oreo chocolate cake, I knew it was what I would bake for his birthday.

I decided to use the Hershey's Perfectly Chocolate Cake recipe for the cake. It comes together really quickly and is always a success. I baked the cake in two 9" round pans and then cut each layer into two, to make a four layer cake.

For the cookies and cream filling, I folded crushed Oreos into a whipped cream frosting. I frosted the cake with the Hershey's chocolate frosting and then piped borders around the top and bottom of the cake with the filling and garnished with halved and quartered Oreo cookies.


Cookies and Cream Chocolate Cake
Cake recipe from Hershey's

Cake:
2 cups sugar
1 3/4 cups all purpose flour
3/4 cup cocoa powder
1 1/2 tsp baking powder
1 1/2 tsp baking soda
1 tsp salt
2 eggs
1 cup whole milk
1/2 cup vegetable oil
2 tsp vanilla extract
1 cup boiling water

Preheat oven to 350 degrees and spray two 9" pans with baking spray and line the bottom of the pans with parchment paper.

Add sugar, flour, cocoa, baking powder, baking soda, and salt to a large mixing bowl or stand mixer and mix together until combined. Add eggs, milk, vegetable oil, and extract and beat on medium speed for 2 minutes. Stir in boiling water on low speed until well incorporated. The batter will be thin. Divide batter evenly among pans and bake 30-35 minutes until a toothpick inserted in the center comes out clean. Run a knife around the edge of the cake and cool about 10 minutes. Invert onto wire racks covered with parchment paper and re-invert to another rack to cool right side up. Cool completely.

Frosting:
1/2 cup unsalted butter
2/3 cup cocoa powder
3 cups powdered sugar
1/3 cup whole milk
1 tsp vanilla extract

Melt butter and pour over cocoa powder. Beat on low speed until well incorporated. Add 1 cup powdered sugar followed by 1/3 of the milk, beating on low speed until incorporated, continue alternating until all the powdered sugar is incorporated. Add vanilla and beat on medium speed until smooth. Add more powdered sugar or milk to reach necessary consistency.

Filling:
2 1/2 cups heavy cream
1/4 cup powdered sugar
1/2 tsp vanilla extract
Approximately 20 Oreos

Pour heavy cream into metal mixing bowl and chill in the refrigerator. Crush Oreos in a food processor and set aside. Add vanilla extract to cream beginning on low and gradually increasing speed to medium high as cream thickens. Add powdered sugar slowly while mixing. Beat cream until it holds stiff peaks. Gently fold in crushed Oreos.

To assemble:
Trim off any rounded tops on the cake layers and cut each layer in half horizontally. Brush off excess crumbs. Put a spoonful of frosting on the center of the cake board or platter and top with first layer of cake. Spread about 1/4 of the cream on the first layer and smooth out with a spatula. Add next layer of cake and repeat with next 2 layers, ensuring each layer is level. Once all the layers are stacked, place cake in the freezer for about 15 minutes to set. Apply a crumb coat of frosting, chill about 20 minutes and then frost with remaining frosting. Pipe on remaining filling as desired to decorate and garnish with halved or quartered Oreos.


Happy Birthday Todd!

Thursday, March 18, 2010

24 "Carrot" Gold Cupcakes


Okay, okay... forgive the cheesy pun but I couldn't resist since I baked these carrot cupcakes in shiny gold foil liners. I discovered a bunch of adorable cupcake liners at Bake It Pretty and I couldn't order just one type so I got a variety of fun designs and colors.

This carrot cake is a simple recipe compared to many carrot cake recipes that have extras like raisins or coconut baked in but don't underestimate the simplicity. To me, it's one of those classic recipes that you don't have to mess with - it's already good. The only add-in for this recipe is carrots. It comes together very easily and you probably have the majority of the ingredients on hand. You can also use your food processor to mix up the batter; grate the carrots in the food processor and you just saved yourself a bunch of dishes to wash.

Add a thick cream cheese frosting to these and they are so delicious.


Carrot Cupcakes
Recipe found on Annie's Eats and adapted from Baking Illustrated

Cake:
6-8 carrots, peeled (about 3 cups grated)
2 1/2 cups all purpose flour
1 tsp baking powder
1 tsp baking soda
1 1/2 tsp ground cinnamon
1/2 tsp ground nutmeg
1/8 tsp ground cloves
1/2 tsp salt
1 1/2 cups sugar
1/2 cup light brown sugar (packed)
4 eggs
1 1/2 cups canola oil

Preheat oven to 350 degrees and line 24 muffin cups with liners. Grate carrots and transfer to a large mixing bowl. Add flour, baking powder, baking soda, cinnamon, nutmeg, cloves, and salt and mix together, coating carrots with flour mixture.

In food processor with blade attachment, process both sugars and eggs about 30 seconds. With machine running, slowly stream in the oil until the mixture lightens in color. Pour batter over carrot - flour mixture and mix together until all the dry ingredients are incorporated.

Scoop into prepared muffin tins (I like to use a cookie scoop to make sure each cup has approximately the same amount of batter so they cook easily and it also makes it easier to control drips). Fill the cups about 2/3 of the way full. Bake approximately 20 minutes, rotating pans halfway through. The cupcakes are done when you insert a toothpick in the center cake and it comes out clean. Cool for about 5 minutes in the pan and then transfer to a wire rack to cool completely. Store cooled cupcakes in an airtight container at room temperature until ready to frost them.

Frosting:
12 oz cream cheese, room temperature
1/2 cup butter, room temperature
2 tsp vanilla extract
3 - 3 1/2 cups powdered sugar

Beat together cream cheese and butter on medium high speed until smooth, about 3 minutes. Add vanilla and beat until well incorporated. Add powdered sugar 1 cup at a time and beat on low speed until the frosting reaches the desired consistency and sweetness. Beat on medium high speed for about 30 seconds or until smooth. Transfer to a piping bag and pipe onto cooled cupcakes with a large star tip or frost as desired.

Monday, March 15, 2010

Apple - Apple Honey Granola


Spring is on its way... my first flowers have started blooming. I love when the crocus start to bloom because they are the first thing that comes up and it seems like they bloom almost overnight. One day there is nothing and then all the sudden there are all these little purple flowers. They are so cute, like baby tulips.

But anyway... you most likely aren't reading my blog to learn about flowers. So here's a delicious granola recipe for you to lighten things up a little from all the desserts I've been posting lately. (Don't worry, I have more cupcakes too...)


The base of this granola is unsweetened applesauce and it uses honey to sweeten things up. I added dried apples, chopped dates, almonds and ground flax seed along with the oats. Making your own granola is extremely easy, just toss everything together and bake and it keeps well in an airtight container.


Apple - Apple Honey Granola

2/3 cup unsweetened applesauce
3 cups rolled oats
1/4 cup honey
1 cup dried apples, chopped
1/2 cup dried dates, chopped
1/2 cup chopped unsalted almonds
1/4 cup ground flax seed
1 tsp vanilla extract
2 tsp cinnamon
1/2 tsp ground ginger
1/2 tsp ground nutmeg
1/4 tsp ground cloves
1/2 tsp salt
1 T olive oil (Use canola for a milder flavor - I used my citrus infused olive oil)

Preheat oven to 300 degrees and line a large rimmed baking sheet with a silpat or parchment paper. Combine all ingredients in a large bowl and mix with a wooden spoon until wet ingredients are thoroughly incorporated. Transfer to prepared baking sheet and bake approximately 1 hour, stir/turn after 30 minutes. Let cool completely and then transfer to an airtight container.

Sunday, March 14, 2010

Shamrock Sandwich Cookies

Well technically Shamrock Green Velvet Whoopie Pies but that was too long of a title...


These are just red velvet cake cookies made with green food coloring instead of red. Make sure you get a separate bottle of green liquid food coloring as it takes a lot of color to get a vibrant green color. McCormick makes individual 1 ounce food coloring and its available pretty much anywhere, I found it at Walmart. I didn't need the whole bottle, green is easier to achieve than red. Just be careful when you mix these up, it can get a little messy with all the food coloring.


To do the shapes, find the shape you want and trace it onto parchment paper with a Sharpie or pencil. When you draw the shapes out remember that you will want to pipe inside the lines as the cookies will spread a little. Also, you want a shape that isn't too detailed. Because of how the cookies spread, you have to over-exaggerate the detail when piping so it doesn't all just run together. You can use a Ziploc bag and just snip off the corner if you don't have a piping bag.

The filling is a classic cream cheese frosting. When the cookies are cooled, you'll want to match up the shapes as well as possible and then pipe the frosting on, leaving some space around all the edges so when you sandwich the top cookie on, the filling will squeeze to the edges and not over them.


Shamrock Sandwich Cookies
Recipe adapted from Annie's Eats

Cookies:
1/2 cup unsalted butter, at room temperature
1 cup light brown sugar, packed
1 large egg
1 tsp vanilla
1 T light corn syrup
2 cups all purpose flour
2 T cocoa powder
1/2 tsp baking powder
1/4 tsp salt
1/2 cup buttermilk, at room temperature
1/2 - 1 oz green liquid food coloring

Preheat oven to 375 degrees. Line baking sheet with parchment paper, with pencil side down.

Beat butter and sugar in mixing bowl on medium high speed until light and fluffy, about 2-3 minutes. Add egg and beat until well incorporated. Mix in vanilla and corn syrup and beat about 30 seconds more.

Combine flour, cocoa, baking powder and salt in a small mixing bowl. Add 1/3 of the mix to the batter and beat on low speed until just incorporated. Add 1/2 of the buttermilk and beat until just incorporated. Repeat with another 1/3 of the flour mix and the rest of the buttermilk and finally the last 1/3 of the flour mix. Scrape sides of the bowl as needed. Finally add food coloring, start with about 1/2 and mix until the color is uniform but do not over beat.

Transfer batter to a piping bag fitting with a large round tip and pipe onto parchment paper. Bake about 8 minutes until the cookies are set. Cool about 5 minutes on the pan and then transfer to a wire rack to cool completely.


Filling:
8 ounces cream cheese, at room temperature
5 T unsalted butter, at room temperature
2 tsp vanilla extract
2 1/2 cups powdered sugar

Beat cream cheese and butter on medium high speed until smooth and fluffy, about 3 minutes. Add in vanilla and beat about another minute. Add powdered sugar, 1 cup at a time beating on low until incorporated. Transfer to a piping bag and pipe onto back of 1/2 the cookies.

Friday, March 12, 2010

Chocolate Cherry Coke Cupcakes

When I saw these Cherry Coke Cupcakes over on Annie's Eats, I just thought they were adorable. I of course, starred them in my Google Reader only to buried by many other posts that I starred. I found them again a couple of months later and this time I even printed out the recipe. But again, the recipe got buried. I still didn't have a good reason to make them. Then I came across the recipe once again when trying to decide what kind of cupcakes to make for my sister's bridal shower and I since I was making lemon cupcakes, I decided something chocolate would be good for the other flavor.


The cupcakes are essentially a chocolate buttermilk cupcake made with coke. The filling is cherry pie filling (you can make a filling from scratch if you want but there are already a few steps to these so I took a shortcut - I also used light filling so it wouldn't be too sweet). The coke glaze really adds some coke flavor to the cupcakes so don't skip this step. According to my sister, it tastes like a "coke float", top the cupcakes with a pretty spiral of whipped cream icing and a maraschino cherry and these little cupcakes are adorable.


Chocolate Cherry Coke Cupcakes
Recipe adapted from Annie's Eats
Makes 24 cupcakes

Cake:
3 cups all purpose flour
6 T cocoa powder
1 tsp baking soda
1/2 tsp salt
1 1/2 cups sugar
1 cup unsalted butter, room temperature
2 large eggs
1 cup buttermilk
1 1/2 cups Coke (don't use diet)
3 tsp vanilla extract
1 can cherry pie filling

Preheat the oven to 350 degrees and line muffin pans with liners or spray with baking spray. Sift together flour, baking soda, salt and cocoa in a bowl and set aside.

In a mixing bowl or stand mixer, combine sugar and butter and beat on medium-high until light and creamy. Mix in the eggs one at a time, beating about 1 minute after each. In a large mixing cup or small bowl, combine buttermilk, Coke and vanilla extract. (Make sure you wait for the foam to go down when measuring the Coke and don't worry if your mixture looks curdled when you add the buttermilk.)

Beginning with the dry ingredient mix, add in 4 parts to the butter mixture, alternating with the Coke mixture. Beat each addition just until incorporated.

Use a cookie scoop or piping bag to transfer the batter to the muffin tins, filling each tin about 2/3 of the way full. Bake for 18-20 minutes until the tops spring back when touched lightly and a toothpick inserted in the center cupcake comes out clean. Cool about 5 minutes in the pan and then transfer to a wire rack to cool completely.

Once cooled, use a paring knife to cut out a cone shape in the middle of each cupcake. Add a spoonful of cherry mixture (2-3 cherries) to the well.


Glaze:
1 1/2 cups powdered sugar
3-4 T Coke

Mix together with a whisk in a small bowl. The mixture should run slowly off a spoon so you can drizzle the cupcakes but it won't run all over the place.


Icing:
1 1/2 cups heavy cream
6 T powdered sugar
Maraschino Cherries for garnish

Beat cream in a chilled bowl with whisk attachment or hand mixer on low speed. Begin adding sugar, 1 spoonful at a time, increasing speed as the cream comes together. Whip the cream until it holds stiff peaks, if you dip a spoon in it, the whipped cream should stay on the spoon when you turn it upside down. Pipe the whipped cream onto cupcakes as desired and top with maraschino cherries for garnish.

Thursday, March 11, 2010

Cheddar Ranch Cheese Ball


A lot of people think a cheese ball would be gross... I used to be included in that group of people. Then I actually tried one that wasn't purchased from the grocery store display and vacuum-packed. And I discovered that they can be really good.

You can really adapt a cheese ball depending on what flavors you want. Bacon, green onions, roasted red peppers, sun-dried tomatoes, etc would all be great additions. In this case, I went with the ranch spice packet because my sister is a big fan of ranch dressing and it was her shower. You can also shape a cheese ball into various shapes, like a football for a tailgate party... cheese balls are great appetizers because they are so easy and versatile.


Cheddar Ranch Cheese Ball

8 oz cream cheese, softened
2 cups sharp cheddar cheese, shredded
1 packet powder ranch dressing mix
1 tsp cayenne pepper
6 scallions, white and green parts, chopped
1 cup pecans, chopped

In a large bowl, beat together cream cheese, ranch mix and cayenne pepper until light and creamy. Add cheese and scallions and stir until well incorporated. Refrigerate for 30-60 minutes until the mixture is slightly firm.

Spoon mixture onto a large sheet of wax paper, wrap the paper around the mix and form into a ball. Remove from wax paper, add chopped pecans to wax paper and roll cheese ball over them, squeeze remaining nuts into the ball using the wax paper. Keep wrapped and refrigerate for at least 1 hour more before serving.

Wednesday, March 10, 2010

Spicy Chicken Tortilla Roll-Ups


When looking for an appetizer one of the key requirements is often that it can be prepared in advance. No one wants to be stuck in the kitchen throughout their party and no one wants their guests to be eating cold food that should be hot. This recipe meets both of these criteria. You can assemble these a few hours ahead of time and keep them refrigerated. You could even make the filling the night before. Because it only takes a few minutes to assemble, these come together really easy, so you can make them even if you only have a few minutes of prep time to spare.


And best of all, they are always a big hit. Experiment with the tortilla variations for variety or just use your favorite. For these, I used a mix of spinach, sun-dried tomato and cheddar jalapeno. If you are going to use plain flour tortillas, I would change the cheese to pepper jack just to add a little bit more spice. One note is that you want to make sure your tortillas are at room temperature before you roll them so they are nice and flexible.


Spicy Chicken Tortilla Roll-Ups
Adapted from Sing For Your Supper

1.5 lbs boneless, skinless chicken breasts
1 can Ro-tel diced tomatoes, drained
12 oz cream cheese, softened
1 cup shredded cheddar or monterey jack cheese
1 clove garlic, minced
3 tsp ancho chili powder
1 tsp cumin
1/2 tsp cayenne pepper
1/2 tsp garlic salt (I like Lawry's)
1/4 cup cilantro, chopped
6 scallions, white and green parts, chopped
6-8 large flour tortillas

Season the chicken breasts with salt, half of the cumin, and 1 tsp of the chili powder. Add chicken to a skillet and add about 1 cup of water. Cover and cook on med-high heat until cooked through. Add more water if necessary. Once the chicken is cooked, cool slightly and shred with 2 forks.

In a mixing bowl, combine cream cheese, drained tomatoes, cheese, remaining spices, garlic, cilantro and scallions. Mix together until well-incorporated. Add cooled chicken and stir together.
Lay out tortillas and divide mixture evenly in the center of each. Spread into a thin layer leaving the edges clean. Roll each tortilla tightly. Do not fold in the ends like you would with a burrito but leave them free. Use a sharp knife to cut into 1" thick slices and transfer to a serving platter. (The end pieces will likely unroll a little so just eat the extras). Cover with plastic wrap and refrigerate until ready to serve.

Monday, March 8, 2010

Lemon Cream Cheese Fruit Dip


This is a slightly more grown-up version of the popular cream cheese and marshmallow fluff fruit dip. But it still only has four ingredients and is ready in about five minutes. I think it works as an appetizer, a light dessert or goes well with a brunch menu.

Its perfect with all kinds of fruit; my favorites are strawberries, pineapple, and grapes. You can also add some vanilla wafers or other cookies to the platter. And it's perfect for making a vanilla wafer sandwich - kids will love them - just sandwich a strawberry slice and a spoonful of dip between two vanilla wafers.

Lemon Cream Cheese Fruit Dip

8 oz cream cheese, softened (I used 1/3 less fat)
8 oz low fat vanilla yogurt
Zest of 1 lemon
2 T lemon juice
1 cup powdered sugar

Beat cream cheese until light and smooth. Add in yogurt, lemon juice and zest (reserving a little for garnish if desired) and beat until smooth. Slowly mix in powdered sugar. Keep refrigerated until ready to serve.

Roasted Garlic White Bean Dip


This dip is a great healthy alternative to dips full of mayo or sour cream. Because it uses beans for the base and roasted garlic to add tons of flavor, it doesn't need all of the fat. A little healthy olive oil is all it takes. This dip is very similar to a hummus but uses great northern beans instead of chick peas and I left out the tahini. It works well with vegetables, crackers, or pita bread.

I used parsley in this recipe since I was making it for the shower and I knew some people weren't a fan of cilantro but you could use cilantro to bump up the flavor even more. I also used curly parsley for this because its what we had but I would recommend using flat-leaf parsley.

Roasted Garlic White Bean Dip
Recipe adapted from Amy at She Wears Many Hats

2 cans Great Northern Beans, drained and rinsed
1/4 cup flat leaf parsley or cilantro
1 head garlic
2-3 T olive oil
1 tsp cayenne pepper
1/2 tsp salt
1/2 tsp freshly ground black pepper


Preheat oven to 450 degrees. Peel off most of the paper skin of the garlic and slice off the top of the garlic. Place the garlic on a large square of aluminum foil and pour about 1 T of olive oil over the top of the garlic. Wrap loosely with foil, place on a baking sheet and bake for about 45 minutes until the cloves are brown, soft and fragrant. Set aside and let cool for about 30 minutes.

Add rinsed beans to food processor, add herbs, cayenne, salt and pepper and pulse several times. Slowly stream in remaining olive oil with motor running until the dip is uniform and relatively smooth. Transfer to a serving dish and serve with vegetables, crackers, or pita bread.

Sunday, March 7, 2010

Bridal Shower Menu

It has been a busy couple of weeks... first a trip to Tennessee, then a quick trip to Arkansas, then a trip to Iowa this past weekend to host a bridal shower for my sister. All the travelling didn't leave a lot of time for new updates. Plus, I had to do a craft project and put together this sign... I'm not really a crafty person so things like this usually work a lot better in my head than they turn out but I was pretty happy with how this sign worked. Don't laugh, crafting is not my strong suit.


For the bridal shower, we did light hors d'ouevres and cupcakes since it was an afternoon affair. Pretty easy to put together, most of this stuff can be made in advance so you can put it together the day before and refrigerate. Then you'll just have to assemble the day of the party.


The menu:

Vegetable Platter with Roasted Garlic White Bean Dip
Fruit Platter with Lemon Cream Cheese Dip
Spicy Chicken Tortilla Roll-Ups
Cheddar Ranch Cheese Ball
with Crackers
Cinnamon Roasted Almonds
Triple Lemon Cupcakes
Cherry Coke Cupcakes


I'll be posting the recipes through out this week so check back soon!

Monday, March 1, 2010

Smoky Mountain Chili and Cornbread

We spent this past weekend with a lot of friends in the Smoky Mountains in Gatlinburg, Tennessee. While I'm definitely a beach person, the mountains were beautiful too.

We rented a huge cabin and had a great time! I volunteered to bring chili and decided some cornbread muffins would be a good accompaniment.

Of course, I forgot to take pictures of the chili when I made it or on Saturday so scenery and muffins will have to do this time. The chili turned out really well and for future reference if you ever have to transport a large amount of chili (I made about 12 quarts) or you just want to make it ahead of time and freeze it; transfer the cooked chili to gallon size freezer bags and freeze it flat. Then just reheat in a crockpot or on the stove. The recipe below is cut in half to make a "normal" amount of chili but this would still serve about 10 people and fill a 6 qt crock pot.

Smoky Mountain Chili

2 lbs ground beef
1/2 lb chorizo
1/2 lb Italian sausage
1 large onion, diced
2 cloves garlic, minced
6 oz dark beer
1 green pepper, diced
3 jalapenos, finely diced
2 cans diced tomatoes
1 can tomato sauce
1 small can tomato paste
1 can black beans, rinsed and drained
1 can light red kidney beans, rinsed and drained
1 can dark red kidney beans, rinsed and drained
1 cup corn kernels (frozen)
1 T ancho chili powder
1 tsp cayenne pepper
1 tsp garlic salt
1 tsp ground cumin

Brown meat in a large dutch oven or skillet over medium high heat, crumbling with a wooden spatula. Drain off grease and transfer meat to a bowl. Return pan to heat and add onions and garlic. Cook about 2 minutes and add beer to deglaze the pan, scrape any brown bits off the bottom of the pan and let the majority of the beer cook off. Transfer to a crockpot if desired. Reduce heat to medium-low and add tomatoes, tomato sauce, and beans and stir to combine. Add corn, peppers and spices and cook for at least 60 minutes covered on the stove, stirring occasionally or 3-4 hours on low in the crockpot. Stir in tomato paste as necessary to thicken to desired consistency.

Top with shredded sharp cheddar cheese, sour cream, Fritos, etc. as desired.


Cheesy Jalapeno Cornbread Muffins
Recipe slightly adapted from Elly Says Opa originally from Cooks Illustrated
Makes 18 muffins

1 1/2 cups all purpose flour
1 cup yellow cornmeal (I used Martha White)
2 tsp baking powder
3/4 tsp salt
1/4 tsp baking soda
1/4 cup brown sugar
3/4 cup frozen corn kernels
1 cup buttermilk
2 large eggs
1/2 cup butter, melted
1/2 cup shredded Mexican blend cheese (Monterrey jack, colby, and cheddar)
1-2 jalapeno peppers, finely diced

Preheat oven to 400 degrees and spray muffin tins with baking spray. Combine flour, cornmeal, baking powder, salt, and baking soda in a large bowl and whisk together. Make a well in the center.

In a food processor, combine, corn, sugar and buttermilk and pulse several times. Add eggs and blend until well mixed, the batter will be lumpy from the corn. Pour wet ingredients into well in dry ingredients and begin to gently combine. Add melted butter and continue mixing just until dry ingredients are all mixed in. Stir in cheese and jalapenos.

Spoon into muffin tins, filling each about 2/3 of the way full and bake about 20-25 minutes until the tops spring back when touched. Cool in pans for about 5 minutes and then transfer to wire racks to cool completely. Serve warm with chili and butter or store in an airtight container.

Related Posts with Thumbnails