Pin It button on image hover
Showing posts with label Chocolate. Show all posts

Friday, December 30, 2011

2011's Top 11 Recipes

As 2011 comes to a close (how is that possible?? Didn't it just start?) I'm going to share this year's most popular recipes.  There are a few repeats from last year as some of the "greatest hits" continue to pop up. 

The number one recipe is this White Cheddar Chicken Pasta.  This recipe has become a staple around here and is a quick and easy dinner to throw together.  It's also super versatile.  No wonder it remains a hit.


In the number two spot is this recipe for Chicken Enchilada Soup.  Perfect on a chilly fall or winter day, this soup can be made on the stovetop or in a crockpot. 


In third place is another all-time favorite still sticking with the spicy trend... Spicy Chicken Tortilla Roll-ups.  These are a perfect appetizer for a New Year's or Superbowl party.  They come together quickly and you can make them in advance too.


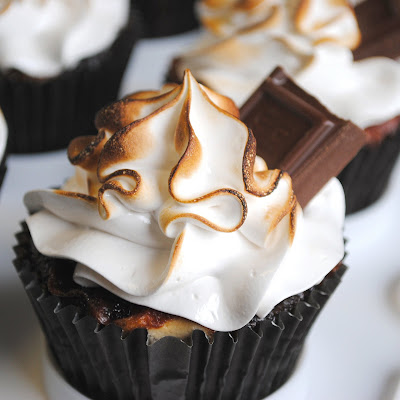
For fourth place, you moved on to dessert and like these S'mores Cupcakes as the top cupcake recipe I've posted over the last three years.  And I can understand why, they are quite impressive especially when you break out the kitchen torch to give them the marshmallow frosting that toasted look and taste.  If you haven't made these yet, you really should try them.


Coming in fifth is another easy weeknight pasta dish.  These lasagna roll-ups are the perfect solution to a classic Italian dish without all the work and without three days of leftovers in the fridge if you're not cooking for a crowd.  Plus these can be made with so many variations.  Try using chicken, beef or Italian sausage in place of the turkey, an alfredo sauce or pesto cream sauce in place of the marinara.  There are all kinds of options to keep these fun.


New to the list of favorites this year is another appetizer that I originally made for the Superbowl this year.  These classic soft pretzels with jalapeno cheese sauce are easier than you might think and make a fantastic weekend snack or party appetizer.  The cheese sauce can be used with the pretzels or use at a queso dip for chips or pour it over enchiladas for even more cheesy goodness.  If you want to experiment with some pretzels, compare this classic method which uses bread flour and boils the pretzels in a baking soda bath to this latest version of Cheese-Stuffed Everything Pretzels that I just tried which uses all-purpose flour and skips the baking soda bath with fantastic results.


In seventh place, a cookie recipe that mimics those super soft grocery store sugar cookies.  Made with a cake mix, this isn't your standard sugar cookie recipe but it does yield delicious cookies and it takes about five minutes to mix up.  You don't have to roll and cut anything and decorations are as easy as a few colored sprinkles if you want them.  I know it's past "cookie season" but these Soft and Thick Sugar Cookies are worth it.


The list is rounded out with cupcake recipes. 

In eigth place, Snickers Cupcakes, a rich chocolate cupcake, filled with caramel and topped with caramel buttercream and chopped Snickers bar pieces.  I've since decided I prefer to add a little chopped candy bar to the caramel filling in the center as well as it helps hold the cupcake together a little better. 


Next up is another chocolate favorite, Chocolate Cherry Coke Cupcakes.  Again these start out with a chocolate cupcake base but this time they get filled with a cherry filling, topped with a Coke glaze and frosted with whipped cream frosting.  A cute little cherry on top make these an adorable and nostalgic favorite.


Next on the list, is a cupcake that could be breakfast or dessert.  Apple Cinnamon Roll Cupcakes are a delicious, portable (although still sticky) cinnamon roll baked up in cupcake form.  The method is the same as a classic cinnamon roll but the cupcake presentation adds a cute touch for a brunch or other gathering.


Finally, the last favorite of the year is a cupcake I baked up for my husband for his birthday this year.  These Orange Creamsicle Cupcakes would definitely make my short list of favorites as well.  The cake is super moist and has a light orange flavor.  The combination of orange buttercream and marshmallow cream filling give the cupcake that creamsicle flavor that takes these over the top.


That wraps up the list of 2011 reader favorites.  All in all, 2011 was a great, although extremely busy, year for my family. 

Of course, my favorite thing I "baked" in 2011 was our daughter, Aubrey, who arrived in February.  I can't believe it's time to start planning her first birthday party now.


From there the year was a blur of selling our house, weddings, vacations, and buying and remodeling our new house that still hasn't really ended but as the year comes to a close, I'm trying to appreciate what we have and live more in the moment rather than rushing to get to the next big thing.  Happy New Year to all my wonderful readers, thanks for putting up with a lot more sporadic posting than I would have liked this year.  Although I don't see 2012 calming down any, I'm hoping I can squeeze in some recipes with a bit more regularity.  I've got some great ones to share with you.

Thursday, December 30, 2010

2010's Top 10

Happy New Year!  2010 was a pretty good year for me, although it sure went by quickly.  The year started and ended with lots of travelling, I think we went home to Iowa a half a dozen times this past year.  I also travelled to Texas a couple of times for my sister's wedding festivities, we went to St. Louis to celebrate our own 1st wedding anniversary, and spent a week at the beach in August with my college roommates.  We ended the year travelling for the holidays and a weekend in Chicago to celebrate my mom's birthday.  My husband started a new job this fall and I kept busy throughout the summer and fall with lots of baking jobs making hundreds of cupcakes and several birthday cakes.  

Of course the big news is that we found out we'll be having our first child in 2011, thank you all for sticking around even though it was tough to keep up with this blog when I could barely think about food for the few months.  These last few months have been busy with preparing the nursery, baby showers, and doctors appointments.  Now we're almost there and our daughter should be here mid-February! 

As we all recover from the sugar coma of the holidays, I'll be sharing some recipes from my baby shower, as well as some freezer meals as I try to stock up before the baby arrives.  For now though, I'll leave you with the most popular recipes from 2010.  Evidently the popularity of cupcakes isn't over yet!


Monday, December 20, 2010

Rocky Road Fudge


Fudge is a classic Christmas dessert but not one I have a ton of experience with.  I've made a couple of different types in the past and found it to be much easier than I expected and this recipe ended up being very easy as well.  The most time consuming part is chopping up the chocolate.  

If you haven't finished your Christmas baking yet, here are some other candy recipes you may be interested in.


And check back tomorrow for Peanut Butter Fudge!

Rocky Road Fudge
Recipe slightly adapted from Dinner and Dessert

18 oz semi-sweet chocolate, roughly chopped
1/2 tsp baking soda
1/8 tsp salt
14 oz (1 can) sweetened, condensed milk
1 T vanilla extract
1 cup mini marshmallows
1 cup salted peanuts, roughly chopped
1/2 cup semi-sweet chocolate chips

Line an 8x11 inch baking sheet with aluminum foil leaving at least 1" overlap on all sides.  You want to use a baking sheet that has at least a 1" high rim.  Spray foil with nonstick spray.

Set up a double boiler with a couple inches of water over medium heat.  In a heat proof boil or double boiler, toss chopped chocolate with baking soda and salt until well distributed.  Stir in sweetened condensed milk and vanilla.  Set bowl over simmering water, making sure that bowl doesnt touch the water.  Stir continuously with a rubber spatula until chocolate is almost fully melted.  It will likely take about 2-4 minutes to melt, remove bowl from heat when there are just a few remaining pieces and stir until smooth. 

Stir in marshmallows, peanuts, and chocolate chips.  Mixture will be quite thick.  Quickly transfer mixture to prepared pan and smooth into an even layer.  Refrigerate until set, at least two hours.  Use foil overhang to remove fudge from pan, peel off foil and chop into approximately 1" square pieces. 

Sunday, November 7, 2010

Kahlua Fudge Brownies

These brownies are very rich and dense, definitely more fudge-like than cake-like.  The addition of a half cup of Kahlua makes them an adult treat but you can replace the Kahlua with coffee if you prefer a non-alcoholic version.  While the majority of the alcohol evaporates during baking, it's hard to determine exactly how much will be left when they are done.  So while these won't make you tipsy, I'm not sure it's a good idea to give them to your kids. 


Like most brownies, these can be mixed up in only a matter of minutes, bake them in a jellyroll pan with at least 1" high sides or another baking dish.  I went with a Bailey's Irish Cream icing because I think the Baileys and Kahlua go so well together, but you could use more Kahlua or just make a simple powdered sugar glaze.  Brownies will keep for a couple of days in an airtight container at room temperature.


Kahlua Fudge Brownies
Recipe adapted from RecipeGirl

Brownies:
1 cup unsalted butter, room temperature
2 cups semi-sweet chocolate chips
1 1/2 cups light brown sugar
2 eggs
1/2 cup Kahlua
2 1/2 cups all purpose flour
1/2 tsp baking powder
1 tsp salt

Preheat oven to 350 degrees.  Spray pan with baking spray.

Set a heatproof bowl over a small pan of simmering water to form a double boiler, add chocolate and butter to bowl and heat, stirring frequently until melted and smooth.  Watch the chocolate carefully, you should remove from the heat just before all the chocolate is melted and continue stirring to melt the final chocolate pieces to avoid scorching the chocolate.  Set aside to cool five to ten minutes.

In a large bowl, mix sugar, eggs and Kahlua on medium speed until well combined.  Add chocolate mixture and beat until well mixed.  Add flour, baking powder and salt and mix until just incorporated.  Pour batter into prepared pan and bake 35-45 minutes until top cracks slightly and toothpick inserted in the center comes out mostly clean.  The baking time will depend on how thick your brownies are due to pan selection.

Icing:
1 1/2 cups powdered sugar
1 T whipping cream
2 T Baileys Irish Cream

Whisk cream and Bailey's into powdered sugar until smooth.  If icing is too thick add a little more liquid, if mixture is too thin, add a little more sugar.  Smooth onto cooled brownies with a spatula and allow icing to set before cutting and serving.  You can chill the brownies in the refrigerator to speed up this process if desired. 

Wednesday, October 13, 2010

Devil's Food Cupcakes with Chocolate Sour Cream Frosting


I've made these devil's food cupcakes several times and they always get great reviews.  They are a great go-to cupcake when you want a rich chocolate cupcake.  They bake up nice and pretty with domed tops and the sour cream adds a bit of extra tang.  If you were curious as to what makes these different from most chocolate cakes, devil's food cake is generally made with melted butter instead of oil, according to Martha Stewart at least.  In my opinion, devil's food cake is also light and airy while many chocolate cakes are more dense. 

These cupcakes are great with a number of different frostings, this past weekend, I made them with raspberry buttercream (the recipe can be found here although I subbed milk for the lemon juice this time), cream cheese frosting and the one pictured here, a chocolate sour cream frosting. 

Devil's Food Cupcakes with Chocolate Sour Cream Frosting
Recipe adapted from Martha Stewart Cupcakes

Cupcakes:
3/4 cup cocoa powder
3/4 cup water
3 cups all purpose flour
1 tsp baking soda
1 tsp baking powder
1 1/4 tsp coarse salt
1 1/2 cups unsalted butter
2 1/4 cups sugar
4 large eggs
1 T plus 1 tsp vanilla extract
1 cup sour cream

Preheat oven to 350 degrees.  Line muffin pans with cupcake liners - this recipe yields approximately 30 cupcakes.  Heat water in the microwave about 90 seconds, stir in cocoa powder, whisking until smooth and set aside to cool.  In a separate bowl, whisk together flour, baking soda, baking powder, and salt.

Melt butter and combine in mixing bowl with sugar.  Beat on medium low speed until mixture is cooled, about five minutes.  Add eggs, one at a time, beating well after each addition.  Add vanilla and cooled chocolate mixture and mix well.  Add 1/3 of the flour mixture, alternate with 1/2 of the sour cream and repeat, beating after each addition until just combined. 

Fill each cupcake liner approximately 3/4 of the way full and bake about 20 minutes, until a toothpick inserted in a center cupcake comes out clean.  Let cool in pans about 5-10 minutes and then transfer to wire racks to cool completely. 

Frosting:
1 lb powdered sugar
1/2 cup cocoa powder
1/4 tsp salt
8 oz cream cheese, at room temperature
1/2 cup unsalted butter, at room temperature
5 oz melted semi-sweet chocolate
1 cup sour cream

Sift together sugar, cocoa powder and salt.  Beat cream cheese and butter on medium high speed in a mixing bowl for 2-3 minutes until smooth and fluffy.  Gradually add in sugar mixture, beating on low speed until combined.  Add melted chocolate and sour cream and mix until combined.  Increase speed to medium high and whip until light and fluffy.  Transfer to a piping bag and frost cupcakes as desired.

Monday, September 13, 2010

Fauxstess Cupcakes

One more marshmallow frosting recipe - this time I'm using the frosting as a filling for the cupcakes though.  These are homemade versions of the ever-popular Hostess cupcakes - complete with little swirls scrolling across the tops. 


A couple tips for these - make your ganache in a small container that is at least a few inches deep so you have enough depth to dip your cupcakes even as you get low on ganache.  Also, you'll want to make sure you fill your cupcakes full enough that they rise over the tops of the liner so you aren't hitting the liner before you hit the cupcake when you dip them.  You'll have to work quickly once your ganache is ready as it cools quickly and gets thicker as it cools so its harder to make the tops of the cupcakes smooth.


To fill these cupcakes, I used the cone method.  Once cool, I cut out a small cone-shape in the center of each cupcake with a paring knife and then filled them with a piping bag full of marshmallow filling.  This allows much more filling in the center than if you just try to pipe the filling in. 

Once the ganache is set, you can add any decoration you want, I used a bit of extra marshmallow filling and changed my piping bag to a small round tip (I think I used Wilton #3) to pipe on the traditional swirls. 


Fauxstess Cupcakes

Cake:
2 cups sugar
1 3/4 cups all purpose flour
3/4 cup cocoa powder
1 1/2 tsp baking powder
1 1/2 tsp baking soda
1/2 tsp salt
2 eggs
1 cup milk
1/2 cup vegetable oil
2 tsp vanilla extract
1 cup boiling water

Preheat oven to 350 degrees and line pans with cupcake liners. Recipe yields about 30 cupcakes. Combine sugar through salt in a large boil. Add eggs, milk, oil and vanilla and beat on low until just incorporated. Increase speed to medium and beat two minutes. Stir in boiling water, the batter will be thin. Transfer batter to prepared pans, filling each liner about 3/4 of the way full, approximately 1/4 cup of batter. Bake approximately 22 minutes, until a toothpick inserted in the center comes out clean. Cool in pans about five minutes and transfer to a wire rack to cool completely.  When cool, use a paring knife to cut a small cone shape out of the center of each cupcake.

Filling:

2 egg whites
1/2 cup sugar
1/4 tsp cream of tartar
1/2 tsp vanilla extract

In a double boiler (I set my stainless steel mixing bowl over a small saucepan) combine egg whites, sugar and cream of tartar and heat over simmering water. Whisk almost constantly, heating to 160 degrees. Transfer mix to mixing bowl and beat on high speed (with whisk attachment if you are using a stand mixer) until egg whites hold stiff peaks. Add vanilla and mix until just incorporated. Transfer to a piping bag and pipe into the holes in the top of each cupcake.  Reserve remaining filling for piping swirls or decoration as desired.

Ganache:
1/2 cup heavy cream
4 oz semi-sweet chocolate

Heat heavy cream until simmering in a small saucepan (you can also microwave but do it in 30 second intervals and watch it closely). Cut chocolate into chunks and put in a small bowl. Pour cream over chocolate and let sit for one minute. Stir until chocolate is melted. Let stand about 5 minutes and then dip each filled cupcake quickly into the chocolate, tap lightly to get rid of the excess and turn over.  Let cool on a wire rack until chocolate is set.  Pipe on swirls or decoration as desired.

Monday, August 30, 2010

Chocolate Marshmallow Cupcakes


These chocolate marshmallow cupcakes are adapted from the S'mores cupcakes I made a while back - which just so happen to be the most popular recipe I've ever posted.  These don't have the graham cracker base and don't require a kitchen torch or incredible timing with the broiler.  They do however require a lot of egg whites to make the frosting, so I recommend a nice custard style ice cream to go along with them.  With a few less steps involved, these are an easier version.


I love this marshmallow frosting.  It does take a little more time than a traditional American buttercream but its so light and glossy.  I've used it on several things lately - stay tuned for some more recipes coming up shortly.  Drizzle a chocolate ganache over the top to add a little something extra. 


Chocolate Marshmallow Cupcakes

Cake:
2 cups sugar
1 3/4 cups all purpose flour
3/4 cup cocoa powder
1 1/2 tsp baking powder
1 1/2 tsp baking soda
1/2 tsp salt
2 eggs
1 cup milk
1/2 cup vegetable oil
2 tsp vanilla extract
1 cup boiling water

Preheat oven to 350 degrees and line pans with cupcake liners. Recipe yields about 30 cupcakes. Combine sugar through salt in a large bowl. Add eggs, milk, oil and vanilla and beat on low until just incorporated. Increase speed to medium and beat two minutes. Stir in boiling water, the batter will be thin. Transfer batter to prepared pans, filling each liner about 2/3 of the way full, approximately 1/4 cup of batter. Bake approximately 22 minutes, until a toothpick inserted in the center comes out clean. Cool in pans about five minutes and transfer to a wire rack to cool completely.

Frosting:
4 egg whites
1 cup sugar
1/4 tsp cream of tartar
Pinch of salt
1 tsp vanilla extract

Set a clean stainless steel or other heat proof bowl over a pan of simmering water to create a double boiler.  (I just use my KitchenAid bowl for my stand mixer to avoid having to transfer.)  Add all ingredients except vanilla and whisk to combine.  Heat, whisking almost constantly, making sure to scrape the sides of the bowl frequently until the mixture reaches 160 degrees.  Transfer to mixer/mixing bowl fitted with the whisk attachment and continue mixing, increasing speed slowly to high speed until the frosting holds stiff peaks.  Add vanilla extract and beat until just incorporated.

Fill a piping bag fitted with desired tip (I used a large closed star tip for these) and pipe as desired onto cooled cupcakes. 

Note: You don't want to make this frosting until you are ready to use it as it will harden so wait until your cupcakes are cooled.

Ganache:
2 oz bittersweet chocolate
1/4 cup heavy cream

Heat heavy cream until simmering in a small saucepan (you can also microwave but do it in 30 second intervals and watch it closely).  Cut chocolate into chunks and put in a small bowl.  Pour cream over chocolate and let sit for one minute.  Stir until chocolate is melted.  Let stand about 5 minutes and transfer to a squeeze bottle.  Drizzle over the top of cupcakes.

Sunday, August 1, 2010

Snickers Cupcakes


While walking through the candy aisle at the grocery store the other day, I got an idea to make Snickers cupcakes.  I picked up some mini candy bars as well as caramels and caramel sauce.  I knew I wanted to do a chocolate cupcake base with a caramel filling but wasn't sure if I wanted to use a caramel candy or caramel sauce for the filling.  For frosting, I went with a caramel buttercream and then topped the cupcakes with chopped Snickers pieces for garnish. 


For the cake, I used my go-to chocolate cake recipe - the Hershey's Perfectly Chocolate Cake recipe.  I love this recipe because it mixes up extremely fast and always turns out a rich, moist cake.  To experiment with the caramel filling, first I baked the cupcakes and added a caramel candy to the center for the last three minutes of baking time.  I wasn't a fan of these though because although the caramel softens in the oven, it quickly hardens back up and makes a very difficult to eat, hard center to the cupcakes.


On to plan B, the caramel sauce.  I hollowed out a cone shape in the center of the cupcake using a paring knife and filled them with a little caramel sauce.  I much preferred this method for the caramel filling.  You can make your own caramel sauce or just buy the caramel sauce found in the grocery store, like ice cream topping. 


Snickers Cupcakes

Cake:
2 cups sugar
1 3/4 cups all purpose flour
3/4 cup cocoa powder
1 1/2 tsp baking powder
1 1/2 tsp baking soda
1/2 tsp salt
2 eggs
1 cup milk
1/2 cup vegetable oil
2 tsp vanilla extract
1 cup boiling water

Preheat oven to 350 degrees and line pans with cupcake liners.  Recipe yields about 30 cupcakes.  Combine sugar through salt in a large bowl.  Add eggs, milk, oil and vanilla and beat on low until just incorporated.  Increase speed to medium and beat two minutes.  Stir in boiling water, the batter will be thin.  Transfer batter to prepared pans, filling each liner about 2/3 of the way full, approximately 1/4 cup of batter.  Bake approximately 22 minutes, until a toothpick inserted in the center comes out clean.  Cool in pans about five minutes and transfer to a wire rack to cool completely. 

When cool, use a paring knife to cut a small cone shape out of the top of each cupcake.  Add caramel sauce as desired.  You can cut the point off the cone and add it back to the cupcake if desired. 

Frosting:
1 cup unsalted butter, at room temperature
1/4 cup caramel sauce
1/4 cup heavy cream
1 tsp vanilla extract
1 lb powdered sugar
8 mini Snickers bar for garnish

Beat butter on medium speed until smooth and creamy, about two minutes.  Add caramel sauce, heavy cream and vanilla and mix to incorporate.  Add powdered sugar, one cup at a time, beating on low speed until incorporated to reach the right consistency.  Increase speed to medium-high and whip about one minute until light and fluffy.  Fill a piping bag and pipe onto cupcakes or frost as desired.

Coarsely chop candy bars and sprinkle over the top of cupcakes.

Tuesday, July 27, 2010

Oreo Cupcakes


These cupcakes are perfect for the Oreo cookie lover. They start out with half an Oreo in the bottom of the liner. Add more chopped cookies to the batter and garnish with yet another Oreo. Topped with a cream cheese frosting, these cupcakes are cookies and cream heaven.


The most time consuming part of these cupcakes is separating the Oreo halves for the bottoms of the cupcakes. Because I'm a little too Type A, I wanted to make sure all the cupcakes had an Oreo half complete with the cream filling. So I ended up splitting about 50% more Oreos than I would have needed. No big deal though, just add the extras, along with the other halves into the food processor to add to the cupcake batter. You can crush the Oreos a few different ways, I throw mine in the food processor and pulse just a few times so I get a nice mix of small and large pieces. You definitely want the cookies on the chunky side so that the pieces show up in the batter and you don't just end up with gray cupcakes. If you don't want to mess with the food processor, you can add the cookies to a large Ziploc and crush with a rolling pin or just chop them up with a knife.


Oreo Cupcakes
Recipe adapted from Beantown Baker

Cake:
1/2 cup unsalted butter, at room temperature
1 2/3 cups sugar
3 large egg whites
2 1/4 cups all purpose flour
1 tsp baking powder
1/2 tsp salt
1 cup milk
2 tsp vanilla extract
36 Oreo cookies

Preheat oven to 350 degrees. Line 24 cupcake cups with liners. Separate 24 Oreos, leaving cream filling on one half. Place cream side up in the bottom of each liner. Add the other halves and remaining cookies to food processor and pulse a couple times to create large chunks. Set aside Oreo chunks.

Combine butter and sugar in a mixing bowl and beat on medium speed for 2-3 minutes until light and fluffy. Add egg whites, one at a time, mixing well after each addition. Sift together flour, baking powder and salt in a small bowl. Add milk and vanilla to a large measuring cup and stir together. Add 1/3 of the flour mixture to the butter mixture and mix on low speed just until incorporated. Follow with 1/2 the milk mixture, mix on low and continue alternating additions, ending with flour mixture. Stir in Oreo chunks.

Scoop batter into prepared liners, filling 2/3 of the way full. Bake for 18-20 minutes until tops are golden and a toothpick inserted in the center comes out clean. Cool in the pan about five minutes and transfer to a wire rack to cool completely.

Frosting:
1/2 cup unsalted butter, at room temperature
8 oz cream cheese, at room temperature
1 T vanilla extract
2 T heavy cream
1 lb powdered sugar
24 Oreos for garnish

Beat butter and cream cheese on medium speed until smooth and creamy, about 2 minutes. Add vanilla and cream and beat until incorporated. Add powdered sugar, one cup at a time, beating on low speed until incorporated. Increase speed to medium high and whip for 30 seconds to a minute. Fill a piping bag and pipe onto cupcakes as desired.

Garnish with an additional Oreo or Oreo halve.

Tuesday, July 13, 2010

Mudslide Cupcakes


I was brainstorming ideas for cupcakes for a couple's shower the other day and I thought it would be fun to make some boozy cupcakes. Since the couple is getting married in Las Vegas, the hostess chose to make The Hangover the theme of the shower. I wanted to do a chocolate cupcake and non-chocolate cupcake for some variety. Eventually I decided on chocolate Kahlua mudslide cupcakes with Bailey's Irish Cream buttercream frosting and Strawberry Margarita cupcakes. (Stay tuned, I'll post the recipe for those soon.)


I also wanted to decorate the cupcakes with something "Las Vegas-y" so I made some little cupcake toppers with fondant. I layered circles of black and red fondant and then made little white fondant dice squares - adding the numbers with a black edible marker. I baked the cupcakes in red foil liners and overall, I thought they turned out really cute.


Chocolate Kahlua Mudslide Cupcakes
Adapted from Worth the Whisk

3 large eggs, separated
3/4 cup sugar
1/2 cup unsalted butter
1 cup brown sugar, firmly packed
2 1/4 cups all purpose flour
1/2 cup unsweetened cocoa powder
1 1/2 tsp baking soda
1/4 tsp salt
1/2 tsp vanilla extract
3/4 cup strong coffee, at room temperature
3/4 cup Kahlua

Preheat oven to 350 degrees. Line 2 cupcake pans (24 cupcakes) with paper liners. (You may get a couple extras out of this - I did.)

Sift together flour, cocoa, baking soda, and salt and set aside. In a clean mixing bowl, beat egg whites until frothy with whisk attachment. Slowly add in sugar, beating until stiff peaks form. Set aside. Cream together butter and brown sugar until light and fluffy, about two minutes. Add egg yolks one at a time, beating after each addition. Measure coffee, vanilla and Kahlua and stir together in measuring cup. Add 1/3 of the flour mixture to the batter and mix on low speed until just incorporated. Add 1/2 the Kahlua mixture, mix until incorporated and repeat alternating flour and Kahlua, ending with flour mixture. Gently fold in egg whites.

Fill cupcake liners 2/3 of the way full and bake approximately 20 minutes until a toothpick inserted in the center comes out clean. Cool about 10 minutes and transfer to wire racks to cool completely before frosting.

Bailey's Irish Cream Buttercream

1 cup unsalted butter
1/4 cup Bailey's Irish Cream
1 tsp vanilla extract
2 lbs powdered sugar

Beat butter on medium speed until smooth. Add Bailey's and vanilla and mix until incorporated. Add powdered sugar, 2 cups at a time, mixing on low speed until frosting is the desired consistency. Pipe onto cupcakes as desired. I piped these with a large star tip.

Sunday, April 25, 2010

From Invitations to Dessert: Chocolate Chip Cookie Dough Cupcakes

Today, I want to introduce a new feature: From Invitations to Dessert. I’m pairing up with Nikki from Doodle Dog, a design shop out of the Dallas area, to bring you monthly blog posts featuring a dessert matched with an invitation. We’ll show you ways to carry your party theme from invitations to dessert, picking up design cues throughout, whether it’s a wedding, company party, a birthday extravaganza or a shower of some sort.


First, let me tell you a little about Nikki and her company. Nikki created Doodle Dog in 2008, and focused primarily on commercial advertising (logo design, web design, etc.) but after many requests to create invitations for parties and weddings, she decided to add that service to the mix. From there, the rest was history; now invitations, announcements and other fun party favors have become a part of her repertoire, and as she says, “I have the dream job, I work with expecting moms, excited brides and party planners on a daily basis and I get to make them smile.” Check out her blog here for more pictures.


We started with the chocolate chip cookie dough cupcake. From there, Nikki created an adorable invitation, matching the cupcake colors and tying in the vintage charm that the dessert evokes. Cupcakes work perfectly for a casual wedding; either in place of the cake or packaged as a favor. Replacing cake with cupcakes is a great way to add a unique element to your wedding and save a little money. These particular cupcakes bring a classic flavor that everyone loves. Arrange them on a large cupcake tower or several vintage cake pedestals. Add a small round cake for the bride and groom to cut if you don’t want to forgo the tradition.


The invitation would be perfect for a casual, vintage outdoor wedding and reception. For the invitation, Nikki used a heavy ivory linen stock with a textured chocolate brown backer. The details really make this piece unique and give it a vintage-casual feel. From the playful font, to the unique printed belly band and Love emblem attached to each piece, the invitation is memorable and personal. The whole suite ties together perfectly and helps set the tone for what will be a night to remember with the soft ruffled ivory ribbon and the patterned envelope liner.


neckties: http://www.billyreid.com/men/mens-neckties.html bride and groom: http://www.stylemepretty.com/2009/10/08/vintage-wedding-with-handmade-details-ii/ flowers in a bucket: http://www.stylemepretty.com/2009/10/08/vintage-wedding-with-handmade-details-ii/ car: http://www.stylemepretty.com/2009/10/08/vintage-wedding-with-handmade-details-ii/ barn: http://www.brides.com/planning/receptions/gallery/3158

Nikki put together this inspiration board to show you how to pull the look together. Little details are important to carry out the look and feel of a wedding reception. Brown and cream striped silk ties for the groomsmen with khaki suits bring in a more casual feeling than a traditional tux, the classic striped tie works perfectly with the vintage theme. The barn becomes casually elegant when draped ivory curtains and strung with white twinkle lights. Tie wheat sheaths with ivory ribbon or raffia and paint pumpkins ivory for centerpieces for a fall wedding; add cherry blossoms in ivory pails and pale pink or ivory peonies for a spring wedding. Add in the perfect classic car to make a grand exit instead of a limo and your theme is complete from invitation to exit.

Click here to see more pictures on Nikki's site.


Chocolate Chip Cookie Dough Cupcakes
Recipe adapted from Annie’s Eats

Cupcake:
1 ½ cups unsalted butter, softened
1 ½ cups light brown sugar, firmly packed
4 eggs
2 2/3 cups all purpose flour
1 tsp baking powder
1 tsp baking soda
Pinch of salt
1 cup whole milk
2 tsp vanilla extract
1 cup chocolate chips (I used milk chocolate)

Preheat the oven to 350 degrees. Line 2 muffin pans with liners. Combine the butter and sugar in mixing bowl, beat on medium-high speed until light and fluffy, about 3 minutes. Add the eggs one at a time, beating after each addition. Scrape the sides of the bowl with a rubber spatula as needed.

In a separate bowl, combine the flour, baking powder, baking soda, and salt. Stir together vanilla and milk in a measuring cup. Add 1/3 of the flour mixture to the batter, mix at low speed. Alternate adding flour mixture in 3 parts with ½ of the milk; beginning and ending with the flour mixture. Mix each addition until just incorporated. Fold in the chocolate chips. Scoop the batter evenly into prepared cupcake liners, filling each about 2/3 to ¾ of the way full. Bake about 18 minutes, until a toothpick inserted in the center comes out clean. Cool in the pan about 5 minutes and then transfer to a wire rack to cool completely before frosting.

Frosting:
1 ½ cups unsalted butter, softened
¾ cup light brown sugar, firmly packed
3 ½ cups powdered sugar
1 cup all purpose flour
½ tsp salt
3 T whole milk
2 ½ tsp vanilla extract
Extra chocolate chips for decoration if desired

Beat the butter and brown sugar until light and fluffy, about 3 minutes. Mix in the powdered sugar, mixing on low speed, until smooth. Add in the flour and salt and beat on low speed until incorporated. Add the milk and vanilla and beat until smooth.

Transfer the frosting to a piping bag fitted with a large star tip and pipe frosting on to cooled cupcakes as desired. Sprinkle chocolate chips on top if desired.

Monday, April 19, 2010

Dulce de Leche Cheesecake Bars


If you don't know what dulce de leche is, you need to find out... now. Its a dark, thick, creamy, caramel-y sauce made from sweetened condensed milk that takes these cheesecake bars from good to oh.my.god.good. There are methods for making dulce de leche yourself; I've tried it before without success. I've heard about boiling, baking, and even crockpot methods, but it's much easier to do the "buy it in the grocery store" method. You might not be able to find it at every grocery store but most large stores carry it. Try either the baking aisle or the Mexican/International foods aisle (this is where it is at my store) and it comes in a small can like sweetened condensed milk. Make sure it actually says dulce de leche as I've seen the same brand of sweetened condensed milk in the baking aisle but it was just the ordinary stuff.


These cheesecake bars have a classic graham cracker crust, the dulce de leche filling and are topped with a chocolate glaze. They work perfectly baked in a 9x13 pan, a jellyroll or regular baking pan both work well. Make sure you also have a larger pan to put the 9x13 pan inside of so you can bake the cheesecake in a water bath. Baking the bars in a water bath prevents the cheesecake from cracking. Also make sure not to skip lining the pan with foil. This helps with almost any bar cookie; just lift out the whole pan of bars using the foil and it is so much easier to cut and serve.


Dulce de Leche Cheesecake Bars
Recipe adapted from Annie's Eats

Crust:
1 1/2 cups graham crackers (about 1 package in the Honeymaid box)
3 T sugar
5 T unsalted butter, melted

Preheat oven to 325 degrees. Line a 9x13 pan with aluminum foil, making sure there is at least an inch overhang on all sides, preferably a couple on both ends. In a food processor, process graham crackers to fine crumbs, add sugar and pulse several times to combine. With processor running, add melted butter and process for about 15-30 seconds more. Press crumbs onto the pan in an even layer. Bake for about 10 minutes and cool in pan on a wire rack.

Filling:
1/3 cup whole milk (I used skim milk and just replaced a little bit with heavy cream)
12 oz cream cheese, softened
3 eggs
1/2 tsp salt
1 can dulce de leche

Beat softened cream cheese with mixer on medium-high speed for 2-3 minutes until smooth. Add in the eggs, one at a time, beating and scraping the bowl after each egg. Add the milk and salt and beat on low until smooth. Add the dulce de leche and beat on low speed until smooth. Pour over the crust and smooth with a rubber spatula. Set pan inside a larger pan and add hot water to the larger pan until water is about half way up the sides of the cheesecake pan.

Bake for about 35-40 minutes until filling is just set. Cool on wire rack for about 2 hours and then cover and refrigerate for at least 6 hours more.

Chocolate Glaze:
3 oz bittersweet chocolate
4 T unsalted butter, cut into 8 pieces
2 tsp light corn syrup

In a large measuring cup, add chocolate pieces, butter and corn syrup. Microwave on low powder for about 1 1/2 minutes, stirring every 20-30 seconds until almost melted. Stir until smooth. Pour glaze over chilled cheesecake, tilt the pan or use an offset spatula to smooth the chocolate up to all the edges. Chill at least 30 minutes more.


Use excess foil to remove the bars from the pan, peel foil off the back, and transfer to a cutting board. Using a large sharp knife, cut into squares and serve.

Related Posts with Thumbnails