Pin It button on image hover

Friday, December 18, 2009

German Chocolate Cupcake Bites


Every year for my grandpa's birthday, my grandma made him German chocolate cake from scratch. I think it was just about the only thing she ever baked, especially from scratch. My Great Grandma Tootie was the baker in the family. But nevermind that, German chocolate cake was his favorite, so that's what she made him every year.
German chocolate cake is something I've never made before, but have wanted to try for a while now. Todd needed a dessert for his office Christmas party so I volunteered to make German chocolate cupcake bites for him. I asked my mom for my grandma's recipe and found out that she always used the recipe on the back of the Baker's chocolate box. In fact, the recipe card was a photocopy of the box.
The cake batter is fairly standard and follows the normal cake mixing of beating butter, eggs and sugar and then alternating wet and dry ingredients and finally folding in egg whites. The frosting is similar to a custard process with the addition of pecans and coconut. As a cake, this recipe makes a 3-layer 9" cake, or about 84 mini cupcakes.

German Chocolate Cake
Recipe from Baker's Chocolate
Cake
4 oz. German sweet chocolate
1/2 cup water
2 cups flour
1 tsp baking soda
1/4 tsp salt
1 cup butter, softened
2 cups sugar
4 eggs, separated
1 tsp vanilla
1 cup buttermilk

Preheat the oven to 350 degrees. Spray your pans with baking spray (buy the "baking" formula of cooking spray, it contains flour so it replicates buttering and flouring your pans) or line with cupcake liners.
In a heat proof bowl, combine chocolate and water and melt in the microwave. Heat about 1 1/2 - 2 minutes, stirring at 30 second intervals until melted and set aside. In a separate bowl, mix together flour, salt, and baking soda and set aside.

In the bowl of your mixer, beat butter and sugar until light and fluffy, about 3 minutes. Add egg yolks, 1 at a time, mixing after each addition. Turn off mixer and add in melted chocolate and vanilla. Beat on low speed until well mixed.

Add flour mixture in 4 additions, alternating with buttermilk, beating on low speed after each addition until incorporated. (Unless you have 2 mixers, a stand mixer and a handheld, or 2 bowls, you will need to transfer the batter to a separate bowl and clean you mixing bowl at this point.) Add egg whites to mixing bowl and beat on high speed with the whisk attachment until stiff peaks form. Gently fold egg whites into batter.

To easily transfer batter to cupcake tins, fold a gallon size ziploc bag over a large glass and add batter just as you would fill a piping bag with icing. Don't overfill the bag, you will have to do this in 2 batches. Twist up the top of the bag, squeezing the icing to one corner and smoothing out the air bubbles. Snip off just the tip of the bag to make a small hole and pipe the cake batter into the muffin cups, filling them about 1/2 way full. Bake for approximately 25 minutes until puffed, the tops should spring back when lightly pressed. Cool for about 5 minutes in pans and then tranfer cupcakes to wire racks to cool completely.


Coconut-Pecan Frosting
4 egg yolks
12 oz evaporated milk
1 1/2 tsp vanilla
1 1/2 cups sugar
3/4 cup butter
7 oz flake coconut
1 1/2 cups chopped pecans

Combine egg yolks, milk and vanilla in a large saucepan and whisk together until well-blended. Add sugar and softened butter and cook on medium heat for about 12 minutes until nice and thick, stirring constantly. The mix should be golden brown in color. Remove from heat and add coconut and pecans. Mix well. Transfer to a bowl and let cool (you can refrigerate to speed this up.) Once cooled, frost cupcakes.

Thursday, December 17, 2009

Peppermint Bark

One of the easiest Christmas candies you can make. This takes about 5 minutes of prep time plus a little time in the fridge to set. It is also extremely easy to transport so if you need a last minute snack to take to a holiday party or want something homemade to take to your co-workers, this is quick and easy.


Peppermint Bark
1 lb. semi-sweet chocolate
1 lb. white chocolate
6 candy canes

Line a jellyroll pan with wax paper, leaving about 3" on the sides so you can easily lift out the paper and set aside. (I used a 9x13 pan, make it bigger or smaller depending on how thick you want your candy to be.) Melt semi-sweet chocolate in a double boiler until smooth, stirring constantly. Pour melted chocolate into prepared pan and spread with a rubber spatula. Put pan in the refrigerator to chill for about 15 minutes until set. Meanwhile, add candy canes to food processor and pulse several times until they are broken into small chunks. Do not over process or you will just have peppermint dust.

Remove chilled pan from refrigerator. Melt white chocolate in a double boiler and add some of the peppermint dust if desired. Again, stir constantly until chocolate is melted and smooth. Pour over the semi-sweet chocolate and spread with a rubber spatula. Add crushed candy canes on top and return to refrigerator to chill for at least 1 hour.
Once hardened, lift wax paper sheet and peel off candy. Break candy into pieces as desired.
Note: If you do not have a double boiler, chocolate can be melted in a heat proof bowl set inside a saucepan of simmering water, make sure the bowl you choose fits steadily in the top of the saucepan, or in the microwave, just be careful not to burn the chocolate.

Wednesday, December 16, 2009

Christmas Cookies

Frosty - Part 2... Since I had a love for all things snowman this weekend, I decided to make little Frosty sugar cookies as well. I also made a few ornaments so I wouldn't get bored just decorating snowmen.

I used the same sugar cookie recipe that I made a few weeks ago for Thanksgiving. You can find the recipe for both the cookie dough and royal icing here.

While decorating with royal icing takes a little while to do, it is a pretty straightforward process. When you make a batch of royal icing, divide it into small containers so you can color whatever you need. I recommend using gel food colorings so you don't dilute your icing. Once colored, you may need to add a few drops of water to thin the icing enough to pipe. It should be easy to pipe onto cookies and not require a lot of effort or make your hand hurt. If its hard to do, thin your icing a little. To pipe the outlines, I use a Wilton tip 2 or 3 depending on the size of the cookie.
Once your cookies are outlined, let them dry for at least an hour. While you aren't using your royal icing, make sure to cover the containers so it doesn't dry out. If you are going to store them for an extended period of time, place a piece of plastic wrap directly on the surface of the icing and then cover with the container lid.

To fill in the cookies, add more water to you icing in small amounts until it is the consistency of thick syrup and easily runs off your spoon back into the bowl. The runoff should "melt" back into the bowl and show no signs of disruption after about 5 seconds. Once you have the right consistency, fill another piping bag or squeeze bottle with icing. I recommend investing in the squeeze bottle as it is much easier to control the flow of icing and prevent the icing from just continuously running out of the piping bag. You can usually find them in the cooking supply aisle at Walmart and the like for less than a couple of dollars.

Fill in the cookies by squeezing icing into the center of the cookies, leaving a thin margin around the edges, the icing will "flood" out to fill in the cookies, use a toothpick to help it into corners and pop any air bubbles.
Let the flooded icing dry overnight (at least 12 hours) and then decorate as desired with the original strength royal icing. For these snowmen, I used edible markers to decorate the faces and buttons. I used a Wilton #16 star tip to give the hats some texture, and a Wilton tip #3 to do the scarf. For the ornaments, I used the #16 star tip for the blue centers, and white flooded icing and white sanding sugar for the others.

Monday, December 14, 2009

Frosty the Snowman


Frosty the Snowman was one of my favorite Christmas movies as a kid. I've probably seen Frosty, Rudolph and A Christmas Story about a hundred times. I think snowman are super cute so when I decided to make oreo truffles, I thought they would be perfect to make into little snowmen.

Oreo truffles are a super easy Christmas candy that dont require candy thermometers or any other special equipment. You can make them into traditional truffles, just replace the lollipop stick with a toothpick to dip them in the chocolate coating.


Oreo Truffles
Makes approximately 36 truffles

1 package oreos (somehow mine was mixing about 5 cookies...)
8 oz cream cheese, softened
12 white chocolate

Line a baking sheet with wax paper. Crush oreos in a food processor until the cookies become fine crumbs. If you dont have a food processor, add cookies to a bag and crush with a rolling pin. Add cream cheese and stir until well combined. Roll into 1" diameter balls and transfer to prepared baking sheet. Gently push in lollipop sticks if desired. Freeze for at least 30 minutes.


Melt white chocolate in a double boiler or the microwave. If you use the microwave, use 50% power or the defrost setting and microwave in 30 second intervals, stirring between intervals until melted. Dip the frozen oreo balls in melted chocolate. Drain off excess and transfer to a 2nd baking sheet lined with wax paper.


Chill for at least 30 minutes in the refrigerator and decorate if desired. I used edible food pens to decorate these. Next time I think I will use royal icing as the markers didn't cooperate as well I would have liked on the chocolate. They worked ok at first but as the chocolate got warmer, the writing became more difficult.


Store truffles in the refrigerator until ready to serve.

Wednesday, December 9, 2009

Fusilli with Shrimp and Tomato Cream Sauce

On nights when you forget to defrost something for dinner, frozen shrimp can save your dinner plans. Frozen shrimp require about 5 minutes of cold running water and a colander to defrost. And they cook in about the same amount of time. Plus shrimp are healthy and relatively low in cost. That and they taste delicious with a mild, creamy tomato sauce.

Fusilli with Shrimp and Tomato Cream Sauce
Recipe inspired by Pioneer Woman

1/4 - 1/3 pound large, uncooked shrimp, peeled and de-veined
Approximately 1/2 box of fusilli or other short cut pasta (I use whole wheat)
1 cup diced tomatos
1/2 cup heavy cream
1/4 cup dry red or white wine (I used zinfandel but chardonnay would work just as well)
1/2 small white onion, diced
2 cloves garlic, minced
1 T butter
1 T olive oil (I used roasted garlic infused oil)
About 1 T fresh, chopped flat leaf parsley
About 1 T fresh, chopped basil
About 1 tsp crushed red pepper flakes
Salt and pepper, to taste
Heat a pot of water to boiling for pasta. When it comes to a boil, add salt and pasta. Cook until al dente and drain. Meanwhile, in a large skillet, melt butter and add olive oil over medium high heat. Add shrimp, season with salt and pepper, and cook until they turn pink. Don't overcook them, once they are opaque, they are done. Set them aside on a cutting board.

Add garlic and onions to the pan. Saute about 2 minutes, stirring occasionally. Add wine and scrape the bottom of the pan. Saute about 3 minutes until liquid is mostly cooked off. Add diced tomatos and continue cooking for about 5 minutes. Reduce heat to low and stir in cream. Stir until well combined and let mixture simmer for about 5 minutes. Add herbs and crushed red pepper and return shrimp to pan. Add drained pasta and salt and pepper to taste.

Tuesday, December 8, 2009

Stuffed Shells

Until I was about 25, I had never ever had stuffed shells. Or stuffed pasta of any kind really. No shells, no manicotti, I probably had some Chef Boyardee ravioli at some point but that doesnt really count. We didnt eat a lot of Italian food as kids but I love it now. Pretty much any kind of pasta is good in my book.

When I first tried stuffed shells, I had a plain vanilla version, pasta shell stuffed with basic ricotta cheese. Boring, nothing inspiring, nothing to get excited about.

About a year ago I decided to try making stuffed shells again myself. But I figured I should add something more interesting than just ricotta cheese. Mozzerella, Italian sausage, onions, wine, spinach... the possibilities are endless. And any of these will make your stuffed shells a lot more interesting.

Stuffed Shells with Spinach and Italian Sausage

1/2 pound Italian sausage
2 cloves garlic, minced
1/2 onion, chopped
1/4 cup dry red wine
1 cup frozen chopped spinach
1 cup ricotta cheese
1 T fresh basil, finely chopped
1 T fresh oregano, finely chopped
1 tsp crushed red pepper flakes
1/2 cup shredded mozzerella cheese
Approximately 1 cup marinara sauce
Approximately 16 large pasta shells

Heat a large pot of water to boiling, add salt and pasta. Cook until just al dente. Do not overcook since the shells will continue cooking in the oven. Drain shells and set aside.
Preheat oven to 350 degrees. In a large skillet, cook sausage over medium high heat. When browned, add garlic, onions, and wine. Cook about 3 minutes until wine condenses and reduce heat to low. Add spinach, cook until softened, stirring to incorporate. Add ricotta cheese and stir until melted and well combined. Add herbs and crushed red pepper flakes and stir into mixture. Turn off heat.
In a baking dish, spread 1/4 cup marinara sauce over the bottom of the dish. Spoon a heaping tablespoon or so of filling into each shell until filled. Lay the shells, open side up, in the baking dish. Position them close together to keep shells from rolling. Cover with remaining marinara sauce and sprinkle with mozzerella cheese.
Bake in the oven for about 20-30 minutes until cheese is melted and sauce is bubbly.

Monday, December 7, 2009

Thanksgiving Recipes, Part 4


Warm, soft bread might be one of the best things imaginable. Add a little butter and garlic and it just gets even better. These garlic knots seem more difficult than they are. It really doesnt matter how you tie them - that part is just for decoration.
Garlic Knots
Recipe adapted from King Arthur Flour by way of Amber's Delectable Delights

Dough
3 cups bread flour
1/4 cup milk
1 T sugar
1 packet instant yeast
1 1/4 tsp salt
2 T olive oil
1 cup + 2 T lukewarm water

Glaze
3 cloves garlic, finely minced
2 T butter, melted
1/2 tsp Italian seasoning

To make dough, combine flour, yeast, sugar, and salt in bowl of mixer. Add olive oil, water, and milk and stir together. Using the dough hook, knead for about 6-8 minutes until dough is smooth and elastic. Pour 1 T olive oil in a deep bowl and transfer dough to bowl, spinning once to coat the top of the dough. Cover with plastic wrap and allow to rise for about 1 hour until dough doubles in size.

Line a large baking sheet with parchment paper and lightly spray with cooking spray. Divide the dough into 12 equal pieces. Roll each dough ball into a long rope - about 10 inches long. Cross the ends over each other and tie into a loose knot. Fold one end over the top and tuck in and fold the opposite end under the bottom and tuck in. Pinch to seal. Transfer to baking sheet. When finished rolling, cover all the rolls with a clean kitchen towel and let rise for about 45 minutes. If you want to make these in advance, cover the baking sheet with foil at this point and freeze until ready to bake. If you are going to wait more than a couple of days, freeze the rolls on the cookie sheet and then transfer to freezer bags once completely frozen. To thaw, leave the rolls at room temperature covered on the baking sheet for about 3-5 hours until they rise.

Preheat the oven to 350 degrees. To make the glaze, combine melted butter, minced garlic, and Italian seasoning. Using a pastry brush, gently brush the tops of the rolls with glaze and bake 15-18 minutes until lightly golden brown. Brush with additional butter mixture if desired.

Sunday, December 6, 2009

Thanksgiving Recipes, Part 3

Baked Macaroni and Cheese

Recipe adapted from Pioneer Woman

1 pound elbow macaroni (I use whole wheat)
1/4 cup butter
1/4 cup all purpose flour
2 1/2 cups whole milk (you can use 2% but it won't be as rich and creamy, skip the skim milk)
2 1/2 tsp dry mustard
1 egg
2 cups sharp cheddar cheese, grated
2 cups colby cheese, grated
1 tsp + 1/2 tsp salt
1/2 tsp seasoning salt
1/2 tsp cayenne pepper
1/2 tsp dried thyme
1/2 tsp ground black pepper
1/2 cup panko bread crumbs
1/2 cup parmesan cheese grated
Preheat oven to 350 degrees. Spray a 9x13 pan with cooking spray. Heat a large stock pot of water over high heat until boiling. Add 1 tsp salt and add pasta. Cook to just al dente, do not overcook, it should be slightly underdone. Drain and set aside.

Meanwhile in a large pan, melt butter over medium-low heat. Whisk in flour, cook for 5 minutes, stirring constantly. Add milk and whisk in mustard. Cook for about 5 minutes until mixture thickens. Reduce heat to low. Beat egg in a small bowl, add in approximately 1/4 cup of hot milk mixture. Stir constantly to avoid scrambling the egg. Add egg mixture to pan, whisking constantly until sauce is smooth. Add in cheddar and colby cheeses. Stir until melted. Add salts and spices. Pour in drained pasta and stir until evenly coated. You can refrigerate at this point over night if you want to prep in advance.
Pour macaroni mixture into prepared baking dish. Top with parmesan cheese and bread crumbs. Bake for approximately 30 minutes until bread crumbs are golden brown and macaroni is bubbly. Sorry I forgot to take a picture of the finished product after baking since it was a little hectic at that point on Thanksgiving.

Gingerbread Cookies

Gingerbread cookies just smell like Christmas. These are a soft, chewy gingerbread cookie. They have a nice spice but they can be rolled out and decorated like sugar cookies.


Gingerbread Cookies
Recipe adapted from Allrecipes

1/2 cup unsalted butter
1/2 cup sugar
1/2 cup molasses
1 egg
2 cups all purpose flour
1/2 tsp salt
3/4 tsp baking powder
1/4 tsp baking soda
1/2 tsp cinnamon
1 tsp ground cloves
1 tsp ground ginger
1/2 tsp ground nutmeg
Beat together sugar and butter until creamy. Add molasses and egg and continue beating until smooth and creamy. Add spices and flour and mix until just incorporated. Form batter into a ball on plastic wrap, wrap tightly and refrigerate for at least 1 hour.

Preheat oven to 350 degrees. Line cookie sheets with parchment paper. Dust countertop with flour and roll out about 1/2 of the dough to 1/4" thickness. Cut into desired shapes and transfer cutouts to prepared pans. Bake approximately 8 - 10 minutes. Cool about 1 minute on pans and then transfer to wire racks and cool completely. Recipe yields about 3 dozen cookies, depending on size and thickness of cutouts.

Decorate as desired. I used white royal icing in a piping bag with Wilton tip #3 to decorate these. While the icing was still wet, I sprinkled them with white sanding sugar. Let dry at least 12 hours before storing them to make sure the royal icing has hardened. If you outline and flood the cookies with royal icing, let them dry for 24 hours.

Saturday, December 5, 2009

Oatmeal Raisin Cookies

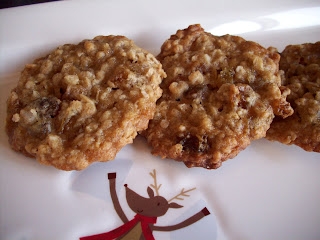
It's cold outside and we didn't have much going on today so I decided to bake. I started with cookies and will work on candy next. First on the list to make were oatmeal raisin cookies, my personal favorite. My favorite oatmeal cookie recipe is the "Vanishing Oatmeal Raisin Cookies" off the Quaker Oats box. They are a perfect soft, chewy oatmeal raisin cookie.


Oatmeal Raisin Cookies
Recipe from Quaker Oats
1 cup unsalted butter, softened
1 cup firmly packed light brown sugar
1/2 cup sugar
2 eggs
1 tsp vanilla extract
1 1/2 cups all purpose flour
1 tsp baking soda
1 tsp cinnamon
1/2 tsp salt
3 cups old fashioned oats
1 cup raisins*

Preheat oven to 350 degrees. Line cookie sheets with parchment paper. Combine butter and sugar in a mixing bowl and beat until creamy. Add in eggs and vanilla and beat well. Add flour, baking soda, cinnamon, and salt and mix until well incorporated. Add oats and raisins and mix in by hand until evenly mixed. (A sturdy wooden spoon works well for this as the batter will be quite stiff.) Drop in rounded spoonfuls onto prepared cookie sheets and bake for approximately 8 to 10 minutes until golden brown. Cool for about a minute and then transfer to a wire rack and cool completely. Store in an airtight container. Recipe will yield about 4 dozen cookies depending on size.

*I like to use golden raisins. I think they plump up better and have more flavor.

Friday, December 4, 2009

Stuffed Pork Loin

After Thanksgiving dinner was over we had plenty of leftovers, but you can only eat so many repeats of food in the same form. So I decided to do something different with the leftover sweet stuffing. Here's the original recipe for the stuffing. With the apples and cranberries in the dressing, I thought it would make a great stuffing for pork loin.


Stuffed Pork Loin

1 boneless pork loin (I used about half of a 2 pound pork loin and it made 4 servings)
1 cup of prepared stuffing
1-2 sprigs fresh rosemary
Salt and pepper

Preheat oven to 400 degrees. Spray a baking sheet with cooking spray. Place pork loin on a clean, flat surface and cut through the thickness of the meat to butterfly the pork loin. Sprinkle with salt and pepper. Spread stuffing over pork loin leaving a little room around the edges. Roll pork loin from one of the short ends, tucking any extra stuffing in as you go. Put meat seam side down on baking pan. Remove rosemary from stems and pat over the outside of the pork loin. Sprinkle with salt and pepper. Tie with kitchen twine if necessary. Bake for approximately 30 minutes (increase time by about 20 minutes for each additional pound of meat) until pork reaches an internal temperature of 160 degrees. Let rest about 10 minutes covered with foil before cutting.


Wednesday, December 2, 2009

Wilton Course 2 - Final Cake


I finished Wilton course 2 last night which was interesting. I don't feel like I really learned that much in course 2 - we learned to make a bunch of different flowers and use royal icing, including pansies, roses, violets, daisies, daffodils, and mums. Royal icing dries hard and lasts a long time, so you can make all sorts of flowers in advance and save them for a cake.We learned the basketweave pattern and a couple other borders to build on what we learned in course 1. We also learned how to make designs in color flow which is an icing that dries hard and allows you to make any pattern you want and peel it off parchment paper onto your cake. That's where the little birds came in.Overall, it was worthwhile but I'm much more excited for course 3 so I can start working with fondant. I think the materials in course 1 and 2 are fairly dated although you do learn some good basic skills.
We didn't really have any choices in the final cake, it had to be a 2 layer, oval cake - they even sell you the pans in the course 2 kit so that you can measure out the basketweave pattern with their template. We had to do the flowers and birds so that's why it sort of looks like Easter threw up on my cake despite the fact that it's December.


Tuesday, December 1, 2009

Thanksgiving Recipes, Part 2

These sweet potatos are, without question, the best sweet potatos I've ever had. The pecans, the apples, the cranberries, all combine with the sweet potatos to make a perfect Thanksgiving (or really any fall day) side dish.

Growing up I hated sweet potatos. The only time of year we ever had them was Thanksgiving. We had the canned yam topped with marshmallow variety and it was awful. I wouldnt even think about trying them.

Then one day I had sweet potato fries at a restaurant with a honey lime dipping sauce... and they were delicious.

So I got a little braver... and tried a baked sweet potato at another restaurant, sprinkled with brown sugar and butter. Also excellent. So then I tried making them at home and I discovered, that I really liked sweet potatos...

And now I think they are my new favorite side dish. So long as they aren't mashed. I still dont like mashed potatos, sweet or not.

Sweet Potato Bake with Cinnamon Crunch Topping

Recipe inspired by Cooking On The Side, originally from McCormick
4 large sweet potatos
2 apples
1 cup dried cranberries
3/4 cup brown sugar
1 cup chopped pecans
1/2 cup orange juice
1 tsp vanilla extract
2 tsp cinnamon
1 1/2 tsp ginger
1/2 cup all purpose flour
4 T butter

Preheat oven to 400 degrees and butter or spray a 9x13 baking dish. Peel and chop the sweet potatos and apples into large chunks. Add cranberries and toss with brown sugar and 1/2 of cinnamon and 1/2 tsp ginger, vanilla extract and orange juice. Cover with foil and bake for about 30 minutes. Meanwhile mix together flour, remaining brown sugar, spices, and cut in butter using a pastry blender or forks until it forms a crumble. Add pecans and sprinkle over the top of potato mix. Continue baking uncovered for another 30 - 45 minutes until potatos are fork tender. Recover with foil if top begins to brown too much.

Thanksgiving Recipes - Part 1

Spinach Salad with Apples and Feta with Cranberry-Orange Vinaigrette

Salad:
8 cups fresh baby spinach
1 large apple (I used Gala), thinly sliced
1/2 cup dried cranberries
1/2 cup feta cheese
1/2 cup chopped pecans
2 T sugar

Dressing:
1 cup cranberry juice (I used OceanSpray Cranberry-Pomegranite Lite)
1 cup orange juice
1/2 cup extra virgin olive oil
2 T dijon mustard
1/4 cup red wine vinegar
S&P

Wash spinach and spin dry. In a small sauce pan, combine cranberry and orange juice and heat to boiling. Stir occasionally, cooking until reduced to about half the volume and cool slightly. Heat a small skillet over medium heat, add pecans to dry skillet with 2 T sugar. Cook until sugar melts and nuts are fragrant, stirring frequently (about 5-7 minutes). Add juice mixture to a small bowl, blender, or food processor. Add mustard, vinegar, and salt and pepper. Blend or whisk until well mixed. Slowly stream in olive oil and continue blending or whisk until combined. Add cranberries, nuts, cheese, and apple slices to salad and toss with as much dressing as desired.


Sage and Onion Stuffing with Mushrooms

6 cups cubed dried bread or stuffing mix (use plain or adjust seasoning as needed)
1-2 cups chicken stock
1 cup celery, finely chopped
1 cup white onion, finely chopped
4 T butter, divided
1 cup mushrooms, roughly chopped
1 egg
2 cloves garlic, minced
10-12 fresh sage leaves, finely chopped
2 sprigs of thyme
1 sprig of rosemary, finely chopped

Cook celery, onions, and garlic in 2 T butter over medium heat until softened and onions are translucent. (Can be done in advance if desired). Add bread cubes to a buttered baking dish. Mix in celery and onion mixture, mushrooms, herbs, and egg. Add chicken stock until moistened. Dot with remaining 2 T butter. Bake uncovered at 375 degrees until golden brown on top, about 40 minutes, add more stock as necessary.


Sweet Stuffing with Cranberries, Apples, and Pecans

6 cups cubed dried bread or stuffing mix (I used a mix of honey wheat and white bread)
2 apples, peeled and chopped
1 cup dried cranberries
1 cup chopped pecans
2 tsp cinnamon
1/2 tsp nutmeg
1-2 cups apple cider
4 T butter, divided

Melt 2 T butter and mix with 1 cup apple cider. Mix together bread, apples, cranberries, pecans, cinnamon, and nutmeg. Mix in butter/cider mixture until well moistened. Dot top with remaining 2 T butter. Bake uncovered at 375 degrees for about 40 minutes until golden brown. Add more cider as necessary.

Related Posts with Thumbnails